Hello guys there, do you know how to edit our video files in Windows Movie Maker on PC for free? If you still have no ideas of the using tips of Windows Movie Maker, why not take the following article as a reference? Here, we can easily learn how to edit videos for free and share them through email, Web or CD etc. Is that cool?

Before we start to work with Windows Movie Maker, as usual, we should know the best supported video formats for Windows Movie Maker, right? Briefly speaking, here are the summary supported file formats:
- Video files: .avi, .asf, .mp2, .m1v, .mp2v, .mpeg, .mpe, .mpg, .mpv2, .wmv, and .wm
- Audio files: .aiff, .aif, .aifc, .mp2, .asf, .au, .snd, .wav, .mp3, .wma, and .mpa
- Picture files: .emf, .bmp, .gif, .dib, .jfif, .jpeg, .jpe, .jpg, .png, .tif, .wmf and .tiff
Using tips on editing videos in Windows Movie Maker?
Add Video Transitions.
Open the movie maker. If the program is opened in “Timeline” view, you can go back to “Storyboard” view by clicking on the “Show Storyboard” tab. And click on “Tasks” to open “Edit Movie” tab. Then click the “View video transitions” and drag your desired transition to the storyboard. You will then view the effect. If you do not like the transition, you can click “Undo” button or right click the transition and choose “Delete” option to remove the transition. Or you can directly drag a new transition to cover the existing one.
Add Video Effects.
Click “View video effects” option and drag any effect you want to the “Star” icon on the bottom left corner of the video thumbnail. The effect will be applied to your video. And you can click “Preview” to view the effect.
Add Titles and Credits.
Click “Make titles or credits”, you will have several options for where to place the titles or credits. They may precede or follow a video clip or a picture, even can be used as an overlay.
Finally, if you are satisfied with the video, click the “File Menu” and select “Save Movie File” option. Then you have completed your movie. Windows Movie Maker can compress all parts of your movie into a single one. The movie size is much smaller so it can be delivered to Web sites or emails.
Q: How to deal with those unsupported videos?
A: That’s exactly a nice question! In order to make some other unsupported video formats such like MTS or XAVC files, etc accepted by Windows Movie Maker, we have to convert the original files to suitable ones. Here a professional Windows Movie Maker converter called Pavtube Video Converter is highly recommended for you. It has the strong ability of working all unsupported video formats with Windows Movie Maker smoothly. Let’s get more details:

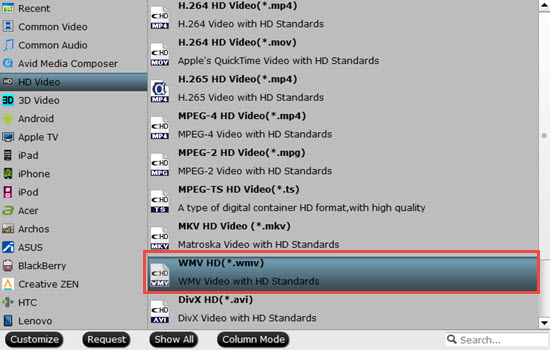
As soon as you download and launch this program on your computer, step into the main interface and click the ‘Add files’ we can easily let the original files in. On the output list, it is necessary for us to choose the right formats for Windows Movie Maker. For example, ‘HD Video’>>’WMV HD Video (*.wmv)’ could be the best one.
For other functional adjustments we can also go to the ‘Edit’ and ‘Settings’ items for more. Or back to the main interface, just hit the ‘Convert’ button, we can get the suitable output files, then easily transfer files into Windows Movie Maker we can enjoy the editing work for free on PC.


Best software for converting videos and adding subtitles. I am very glad. overall it is an ausmmmm product!!!!
I am happy with your software. The reason I bought your software is mostly to convert video from our home video camera’s to wmv for importing to windows movie maker. The source format is XAVC and the conversion is great. I like your software interface and features. I would use the addition ability to handle Tivo files.
Hello, every time i used to check blog posts here in the early hours in the daylight, for the reason that i love to gain knowledge of more and more.