

The background audio helps add energy and emotion to your videos, however, sometimes, we will often come the needs to remove audio in video in the following situations:
1. I recorded a video on my samsung s5 and really need to remove the convesersation in the background. I am hoping there is a way to easily do this. All I need to do is just erase the sound so I can share the video. Any suggestions?
2. Hello! How can I remove the audio from mp4 video files? An easy way please! Fastest with one click and without bloated software! Thanks!
3. Help! I need to strip the audio out of a 3gp file and save the video only (for a music video I’m doing – long story why 3gp is being used). Anyway, I could save only the video stream as an avi file with VirtualDub, but I’d rather not convert it if possible. Any ideas?
Software to remove audio from video
There are some free apps such as Windows Movie Maker claimed to do the work for you, the fact is when you try Windows Movie Maker, it just helps to mute the audio in source video and add a new audio, however, what you really want is remove the audio from source video completely, rather than mute.
Perhaps you can use some professional video editing software such as Sony Vegas or Adobe Premiere to do the job for you, however, you may find that they are too complex to use only for removing audio. Any there any simple and workable alternative solutions?
Best simple way to remove audio from video
Fortunately, here comes a tool called Pavtube Video Converter, which allows you to remove audio from video in virtually any file formats such as AVI, WMV, MP4, MOV, FLV, MKV, VOB, 3GP, AVCHD, H.265, Prores, XAVC/XAVC S, etc. Just Load the video files into the program, save the file as the original file format, then open “Video Editor” window, go to “Audio Editor” tab, check “Audio Remove” option, you will successfully remove audio from original video without any quality loss.
For Mac users, you can turn to Pavtube Video Converter for Mac (best Mac Video Converter) to deleted audio from video on Mac OS X El Capitan.
Free trial for Windows version


Free trial for Mac version


Step by Step to Remove Audio from Video with No Quality Loss
Step 1: Import video files to the program.
Open the audio remover program on your computer, click “Files” > “Add Video/Audio” or “Add from Folder” to import source Video files into the program.
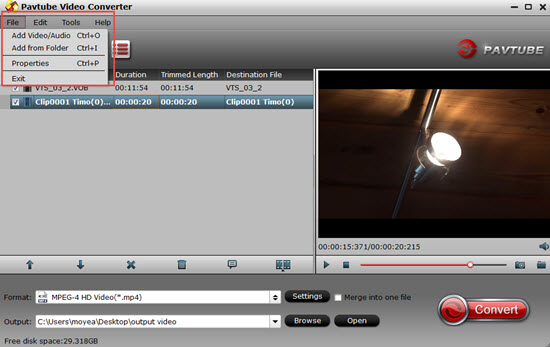
Step 2: Save as original file format.
To delete audio from video without quality loss, you can choose to save the file as the original file format. For example, if your original file are MPEG-4, just choose “MP4″ as the output file format from “Format” drop-down list and keep all other profile parameters unchanged.

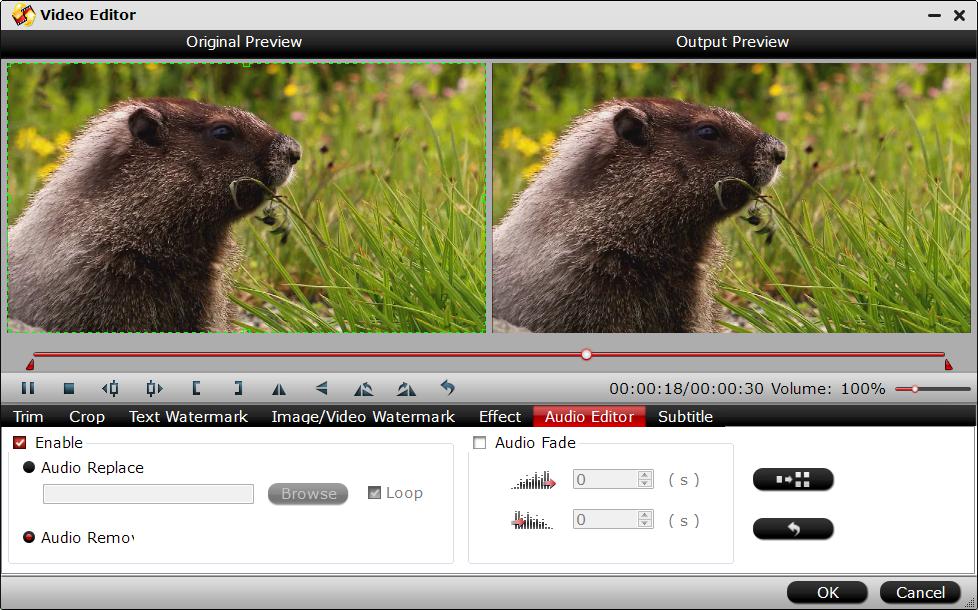
Step 3: Remove Audio from Video.
Select an item to active the “Video Editor” function, then click the pencil like icon on the top tool bar to pop out the “Video Editor” window, click the “Audio Editor” tab, check “Enable” and “Audio Remove” option, then hit right-bottom “OK” button.
Step 4: Begin the conversion.
Go back to the main interface, click right-bottom “Convert” button to begin the perform the audio removing process.
When the conversion is completed, click “Open Output Folder” to pop out the folder with your original video files with no audio.
Further Reading:
Splice/replace/transcode audio for projector, iPhone 6/iPad
Extract Sound Track from Movies and Save as MP3/WAV Audio
How to Replace the Original Audio of your Video Files on Mac?
How to Mix Multiple Audio Tracks into One Track on Mac?
More from my site
 Convert MKV FLAC to AC3/AAC 5.1 Audio: Watching on HDX-1000 Network Media Player
 HDTV Best Supported Video/Audio Formats
 Sony Vegas for Mac Alternative: Edit and Convert Any Video and Audio Clips on Mac
 Play Movies Using Apple TV 4 on 1080p TV with 5.1 Audio
- DaVinci Resolve 12: no audio with .mts files on Mac El Capitan
 Discussion—iPad Air 2 Supported Audio and Video Formats


