Will 4K video look better better 1080p video on 1080p TV?
“Just wondering about this? If I play a 4K video on 1080p TV, will it look better than playing 1080p video on the same TV?”
What will happen is that the built-in player in your TV will downconvert the 3840 x 2160-resolution video to a 1080p format your TV can display. Therefore, what you see is 1080p (4K dithered down to 1080p). Whether the 4K video will look better than 1080p video on 1080p TV/Monitor will not only depend on the quality of the originals but also the downconversion process, which takes place inside the monitor/TV – if your tv/monitor has this feature, otherwise by the computer you’re displaying on the tv/monitor. So the downconversion can depend on which video player you’re using, with different results. It can also depend on the type of images being shown, the downconversion could give better results for certain types and worse for other types. So unless you narrow it down to a specific brand of TV/monitor, a specific piece of video shot in both 4k and 1080p and a specific video player you’re using to downconvert, it’s not possible to give a general answer.
Therefore, if the built-in video player doesn’t do very well in 4K video to 1080p video downconversion process, we highly recommned our powerful yet simple to use 4K Video Compressor – Pavtube Video Converter (get Mac version) to you. The program has full importing support for all 4K video encoded with various different compression codec such as H.264, H.265, Prores, XAVC/XAVC S, MXF, etc. Thanks for its batch conversion mode, you can load multiple video into the application for conversion at one time. It can assist you to easily compress 4K to 1080p easily in various different HD file formats including H.264 HD, H.265 HD, MPEG-2 HD, MPEG-TS HD, QuickTime HD, WMV HD, Audio-Video Interleaved HD, etc with perfect quality and super fast encoding speed.
Related article: Compress 5D Mark IV 4K to 1080p | Enjoy 1080p/720p Video on Android | Play 1080p/720p MKV on Nvidia Shield Tablet 2
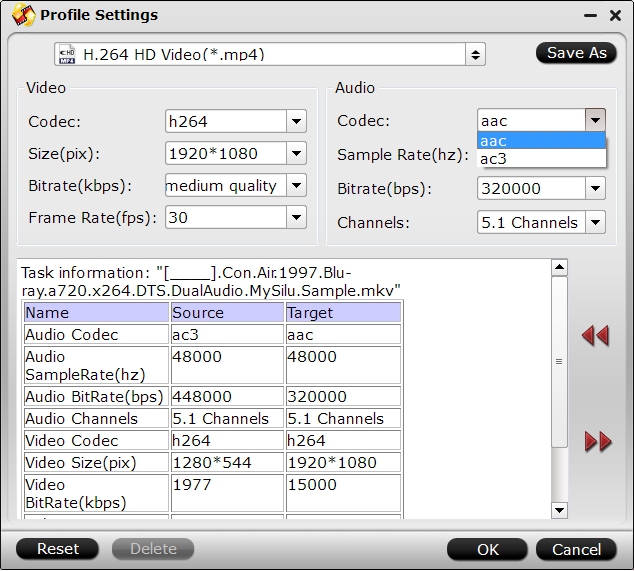
To compress 4K to 1080p, make sure to adjust output video resolution as “1980*1020″ in the program’s “Profile Settings” window. You can also tweak other settings such as video codec, bit rate, frame rate, audio codec, bit rate, sample rate, channels, etc according to your own needs.
Hardware encoding acceleration for H.264/H.265 codec
For those people who wish to compress 4K to 1080p with either H.264 or H.265 codec, you can make good use of the hardware encoding acceleration used the the program to get up to 6x faster H.264 encoding speed as long as you run your computer on Graphic cards that supports Nvidia CUDA or AMD App technology or up to 30x H.265 codec encoding speed as long as you run your computer on Graphic card that supports Nvidia NVENC technology.
Tips: Hardware encoding acceleration are not supported by the Mac version.


Step by Step to Compress 4K Video to 1080p
Step 1: Add 4K videos.
Open the program, click “File” menu, from its drop-down option, select “Add Video/Audio” to load 4K video to the program.

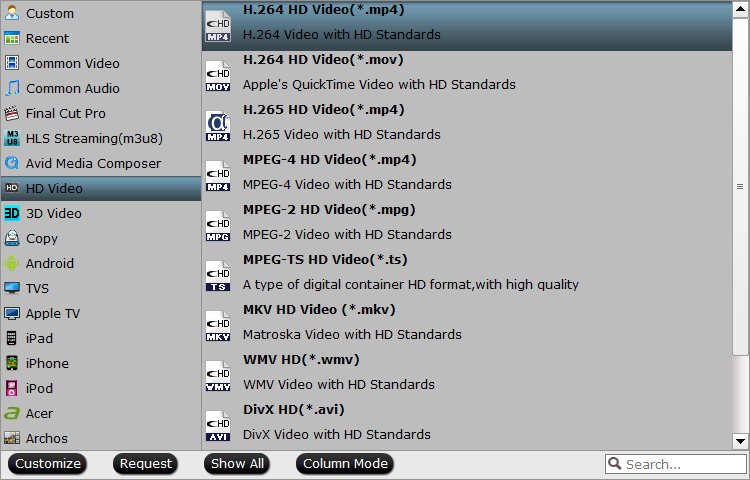
Step 2: Choose output file format.
From “Format” bar drop-down list, choose the formats that you want to output for later use. For compatibility consideration, it is idea for you to choose “Common Video” > “H.264 HD Video (*.mp4)” as output file format. You can also choose other HD file formats according to your own needs.
Step 3: Compress 4K video to 1080p.
Open “Profile Settings” window, click “Size(pix)” to select 1920*1080 as the final resolution for output video.
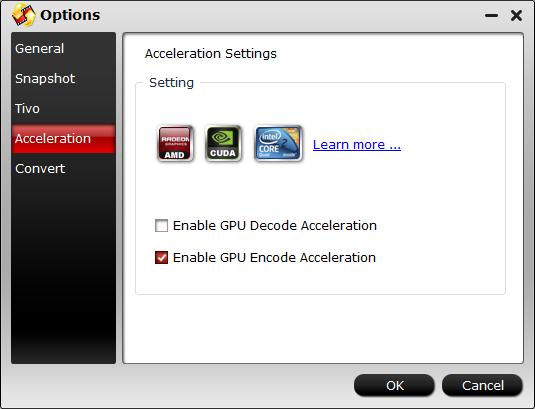
Step 4: Enable GPU Encode Acceleration.
Click “Tools” > “Options”, in the opened “Options” window, click “Acceleration” menu, then check “Enable GPU Encode Acceleration” otpion so that the program will accelerate conversion speed when encoding 4K video to HD H.265/H.264 codec.
Step 5: Start 4K video to 1080p compression process.
After all setting is completed, hit the “Convert” button at the right bottom of the main interface to begin 4K video to 1080p shrinking process.
When the conversion is finished, click “Open Output Folder” icon on the main interface to open the folder with generated files.