

Before uploading our personal made SD, HD or Even 4K video to YouTube, we often need to do some video compression work so that the video can be uploaded with fast speed and also get a better video quality. The following article will show you the best way to compress video for YouTube uploading.

Before compressing video for YouTube, you should be clear what are the best video formats and profile settings should we compress video for YouTube uploading and to what extent can we compress video for YouTube uploading?
1. Best video formats for YouTube
All popular file formats including AVI, WMV, MOV, 3GP, MPEG, MP4, FLV, SWF, WebM and MKV (H.264) can be easily uploaded to it. If the video that you are going to upload to YouTube are not included in above list, you will need to compress YouTube in smaller-sized video formats like WMV, MP4, FLV, etc. And the most suitable video codecs for YouTube uploading are H.264 High Profile format, while the audio codec are AAC-LC with Stereo or Stereo +5.1, sample rate 96khz or 48khz.
2. File Size and Duration.
By default, you can upload videos that are up to 15 minutes long with a verified account. And the maximum file size is 20GB. If your video file is longer than 15 minutes or larger than 20GB, try to shorten the video length and compress video file size by uploading to YouTube.
3. Resolution and aspect ratio.
When uploading videos, it’s important to take into consideration the resolution and format the video is in. By default, YouTube uses 16:9 aspect ratio players. Anything other than that will have black bars on the left and right sides (or sometimes on the top and bottom). These black bars allow the video to remain in the same quality and prevent cropping or stretching.
The YouTube help section recommends encoding in the following formats for perfect playback:
1080p: 1920×1080
720p: 1280×720
480p: 854×480
360p: 640×360
240p: 426×240
4. Frame rate.
If it’s possible, you’d better keep an original frame rate. Usually videos have the best quality if there frame rate is between 25-30 fps. Since spring 2014 YouTube supports 60fps frame rate that video gamers begged for. Some modern cameras give even 2000 fps, but YouTube doesn’t support such a quality yet.
5. Bit rate.
Bitrate is highly dependent on video codec. YouTube published recommendations on bitrate value. See the table below. If you convert video for YouTube, please try to stick to it.
Best YouTube Video Compressor for compress video for YouTube uploading
To compress video for YouTube uploading with all above listed standards, you can utilize our professional YouTube video compressor – Pavtube Video Converter to compress virtually any file format by using the ways of shortening video length, changing video format, codec, bit rate, frame rate, resolution, etc to get best YouTube uploading file formats.
Related topics: compress video without quality loss | best video movie compression software
For Mac users, please download Pavtube Video Converter for Mac to compress video for YouTube on Mac OS X El Capitan.
Free trial for Windows version


Free trial for Mac version


How to Compress Video for YouTube Uploading with Fast Speed and Best Quality?
Step 1: Load video files into the program for compressing.
Launch best YouTube video compressor on your computer, on the main interface, click “File” > “Add Video/Audio” or “Add from folder” button to load source video files into the program.

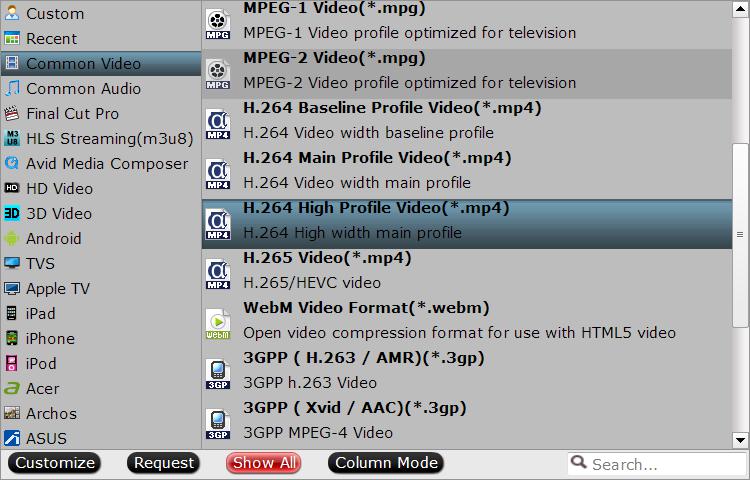
Step 2: Choose output file format.
Click “Format” bar, from its drop-down list, select YouTube supported file format with smaller file size formats such as WMV, FLV, MP4. Here, we choose to output the most suitable H.264 High Profile file format.
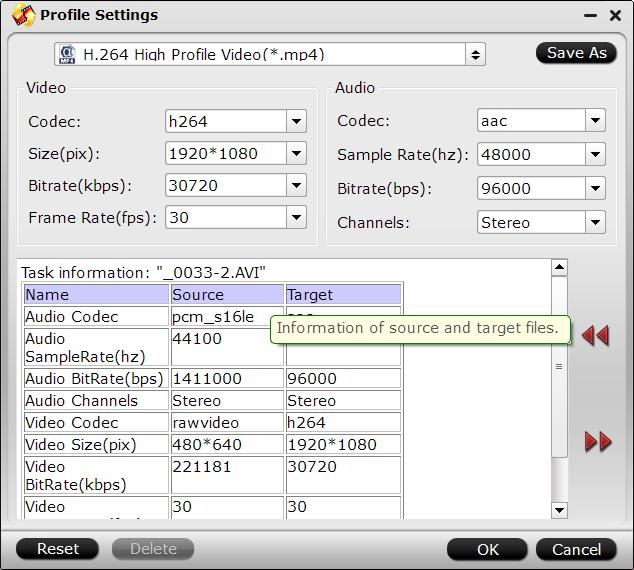
Step 3: Change output profile parameters.
If you do not want to change the original file formats or wish to further reduce the file size, you can adjust video, audio settings like file resolution, frame rate, bit rate, codec, etc(lower resolution, frame rate and bit rate will also reduce the file size and lower the output quality, therefore, make sure the keep a balance between file size and quality.)
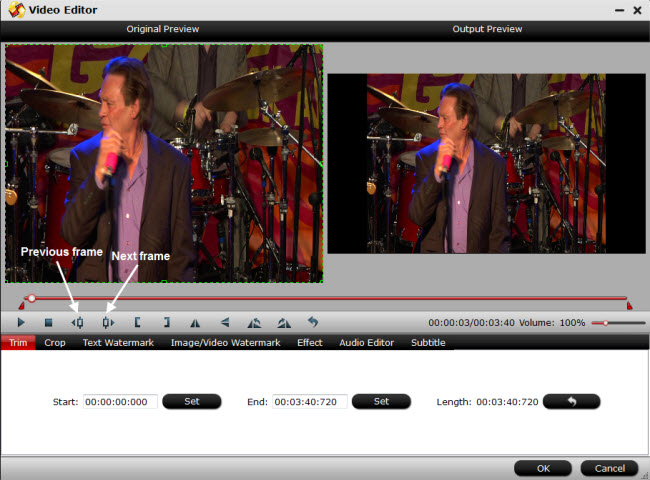
Step 4: Trim or split the video.
If you do not want to loss any quality when compressing video for YouTube uploading, you can trim video to cut off unwanted parts or split large video into small pieces.
Trim to shorten video length: Open “Video Editor” window and switch to the “Trim” tab, you can drag the slider bars to include the segment you want to remain, click the left square bracket to set start point, and click the right square bracket to set end point when previewing the video or directly input specific values to “Start” and “End” box.
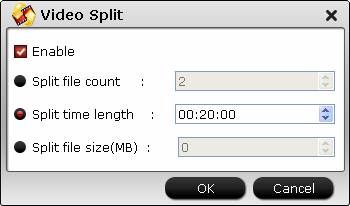
Split video into small parts: Click the “Split” button “http://www.multipelife.com/wp-content/uploads/2014/04/split.jpg” under file list to launch the “Video Split” window. Checking “Enable” to enable it, and then you can split the file by file count, time length, or file size.
Step 5: Start video to YouTube compression process.
After all the setting is completed, hit right-bottom “Convert” button to begin the YouTube video compression process.
More from my site
 Variously Convert XAVC to MOV, AVI, MKV, MP4, MPG, WMV, FLV, SWF on PC/Mac
 Upload DVD to YouTube Smoothly With Best Quality
  How Can I Convert Different Video Types to .MP4 Format for Playback?
 8 Compression Ways to Make A Video File Smaller
 Play HD/4K Videos on Sony Xperia Z4 Nicely
 How to Upload DJI Phantom 4 4K recordings to Instagram?


