

Have a lot of movies or videos in MKV file format stored on your local computer and wish to enjoy them on your newly purchased Samsung, Google or HP Chromebook but have no idea how to make that realized. The following article will show you a simple and detailed step by step guide to get MKV files played on Chromebook.
How to play local video on Chromebook?
The Chromebook lacks teh type of hard drive that you’d expect from a computer, therefore, you won’t be able to play local video on Chromebook from local hard drive. The good news is that Chromebook features USB ports and SD card slots, which let you connect to external storage devices for those times when you need to access a file that you have saved not to the cloud but an external hard drive, thumb drive or SD card. Therefore, you can store your local MKV files on an external drive for viewing on Chromebook.
Supported external hard drive system by Chromebook OS
Chrome OS supports a wide range of file systems for external drives. It can read and write to the NTFS file system that Windows PCs use, read (but not write to) the HFS+ file system that Macs use, and cross-platform FAT16, FAT32 and exFAT file systems. It also supports the MTP file system used by digital music players and ISO9660 and UDF used by CDs and DVDs.
Supported media file formats by Chromebook OS
According to Google, you can play the following video and audio file formats on Chromebook:
Video: .3gp, .avi, .mov, .m4v, .mkv, .webm,
Audio: .m4a, .mp3, .ogv, .ogm, .ogg, .oga, .wav
Codec:
From above lists and tablet, we can see that although Chromebook has included native import support for MKV container file format, however, it is well known that MKV can be encoded with various different video and audio codec, if the MKV file are encoded with the incompatible video codec such as MPEG-1, MPEG-4, H.265/HEVC, WMV/VC-1, etc or audio codec like WMA, AC3, DTS, FLAC, ALAC, DTS-HD, Dolby TrueHD, etc. There will be either no video or audio when viewing on Chromebook.
Convert unsupported MKV for Chromebook watching
To fix the format incompatible issue, you can download our best Chromebook Video Converter – Pavtube Video Converter Ultimate, which can assist you to transcode all MKV files compressed with above listed unsupported video and audio codec to Chromebook readable MP4, WebM, MOV, AVI, 3GP, OGV with above listed compatible video and audio codec.
The program supports batch conversion mode, so that you can load multiple MKV files into the application for conversion at one time. If you are not satisfied with the output file quality, feel free to adjust the output profile parameters such as video codec, bit rate, frame rate, resolution and audio codec, bit rate, sample rate, channels in the program’s “Profile Settings” window according to your own preference.
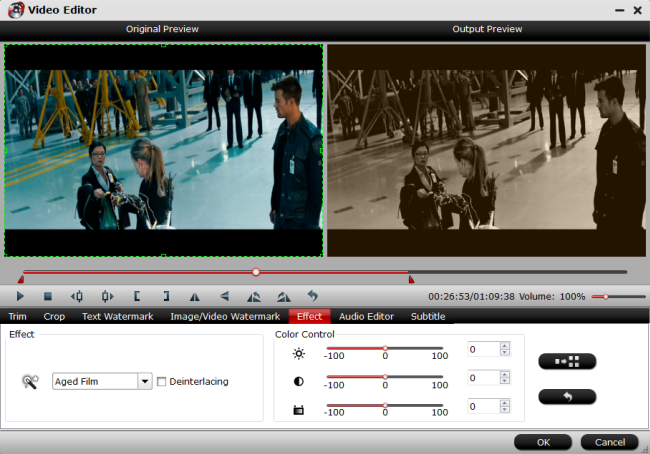
Remove subtitle and deinterlace of MKV files
As Chromebook can’t play video with subtitle, if the MKV files are attached with subtitles, you can remove the MKV subtitles by selecting the “none” option under “Subtitle” drop-down list. What’s more, interlaced video is not supported on some Chromebook models, you can also fix that with our program by ticking off the “Deinterlacing” option to deinterlace interlaced video to get better output video quality.
For Mac users, you can switch to download Pavtube iMedia Converter for Mac to perform the conversion on on macOS High Sierra, macOS Sierra, Mac OS X El Capitan, Mac OS X Yosemite, Mac OS X Mavericks, etc.


|
Get Pavtube Video Converter Ultimate with 20% off discount, coupon codec: 45K2D47GJH
|
Step by Step to Convert MKV for Chromebook Viewing
Step 1: Load unsupported MKV files into the application.
Download the free trial version of the program. Launch it on your computer. Click “File” menu and select “Add Video/Audio” or click the “Add Video” button on the top tool bar to import source MKV files into the program.

On the main interface, from “Subtitle” drop-down list, select “None” to remove subtitles from MKV files for Chromebook playing.
Step 2: Set output file format.
Tap on the “Format” bar, select one of Chromebook playable file formats such as “H.264 HD Video(*.mp4)” under “HD Video” main category.

Step 3: Adjust to output Chromebook supported audio codec.
Click “Settings” to open “Profile” settings window, in audio section, from “Codec” drop-down list, select Chromebook compatible audio codec such as “aac”. You can also tweak other settings such as video bit rate, frame rate, resolution, audio bit rate, sample rate and channels according to your own needs.

Step 4: Deinteralce video.
Open “Video Editor” window, under the “Effect” tab, select “Deinterlacing”to convert interlaced video into a progressive form so that you can enjoy a better and clear video effect.
Step 5: Begin the conversion process.
After all setting is compelted, press the “Convert” button in the right-bottom and MKV to Chromebook conversion process will start automatically.
When the conversion is over, click “Open output folder” to pop out the converted files, you will then have no problem to play converted files on Chromebook from external hard drive.
More from my site
 Tips on Streaming Any Video Formats to Google Chromecast
 DropBox and HD Video/Movie Files Are Not A Good Fit
 iMovie & M2TS Tutorial: import/convert M2TS to iMovie on Mac
 Store Video on Network Hard Drive for Roku
- Best Free Online Programs to Convert MOV to MP4
 Best VR Video Converter for macOS High Sierra Review


