The Network Hard Drive is a high capacity storage that connects to your home or office network so that you and other users you designate can access your files from mobile devices and PCs without plugging in to the drive. For Media enthusiast with a a large digital video collection, it would be a good option for you to store all your favorite media on Network Hard Drive, so that you can conveniently view them on your computer, smartphone, tablet or TV over your Local Access Network (LAN). In this article, we will mainly focus on how to store video on Network Hard Drive for playing with Roku or computer.
Tips to store video on Network Hard Drive
It won’t e difficult to copy or store digital video with any file formats on Network Hard Drive like QNAP, Buffalo TeraStation, Synology Diskstation, Western Digital My Cloud, etc since all those Network Attached Storage have no specific requirements on the digital video formats store on it. However, there are other important tips we should pay attention to:
– To large large collection of digital video, make sure that there are at least 6TB to 8TB of space on your Network Hard Drive.
– When you’re serving 1080p HD and 4K video to your laptops and mobile devices, a Network Hard Drive with a more powerful chip and more memory will help out in the long run.
Play video on Network Hard Drive with Roku or computer
The Media Player on Roku allows you to watch your own personal video files by accessing a media server on your local network. A lot of Network Hard Drive have a built-in DLNA Server such as Plex, Windows Media Player, Twonky, PlayOn which can work with Roku Media Player.
To play video on Roku Media Player via DLNA server software listed above, make sure that the video must be included Roku supported file formats:
– Video – H.264/AVC (.MKV, .MP4, .MOV)
– Audio – AAC (.MKV, .MP4, .MOV); MP3(.MP3, .MKV); WMA (.ASF, .WMA, .MKV), FLAC (.FLAC, .MKV), PCM (.WAV, .MKV, .MP4, .MOV), AC3/EAC3 (.MKV,.MP4. .MOV, .AC3), DTS (.MKV, .MP4, .MOV,.DTS), ALAC (.MKV, .MP4, .MOV, .M4A)
– Playlists -.M3U, .M3U8
– Image – JPG, PNG, GIF (non-animated)
The following media formats are supported on Roku devices including Roku 4/Premiere/Premiere+/Ultra that support 4K
– 4K Video – H.265/HEVC (.MKV, .MP4, .MOV); VP9 (.MKV)
– 4K Video – H.264 (Roku Premier, Premier+, and Ultra only)
If the video that you try to view on Roku via DLNA server software are not supported by Roku Media Player, sometimes, the DLAN server will try to transcode the file for you, but that will be very CPU intensive and also temporary storage consuming. Therefore, it would be much ideal for you to use a third-party video conversion app such as Pavtube Video Converter Ultimate (review) to virtually any unsupported video including with the resolution of 4K/2K/HD/SD to Roku Ultra/Premiere+/Premiere/4/3/2 playable video and audio file formats listed above. Besides digital video, you can also use the program to rip commercial Blu-ray/DVD disc for Roku playback via DLNA Server software.
For those people who try to play 4K video on Roku 3/2/1 which only support to stream video with the maximum resolution of 1080p via DLNA Server software, you can compress 4K to 1080p for smooth streaming experience on those non 4K streaming Roku models.
For your convenience, Pavtube Video Converter Ultimate is available on Windows and Mac platform. For Mac users, you can download the Mac version – Pavtube iMedia Converter for Mac to complete the conversion on macOS Sierra 10.12. The program is pretty simple to use, any one can learn to use it in minutes. In addition, the results produced by the program are pretty high quality, you can’t tell the difference between the converted video and the original source video.
Free download Windows version


Free download Mac version


How to Convert Video for Roku Playing via DLNA Server Software?
Step 1: Import video.
Download the free trial version of the program. Launch it on your computer. Click “File” menu and select “Add Video/Audio” or click the “Add Video” button on the top tool bar to import source video files into the program.

Step 2: Choose Roku supported file formats.
Click the Format bar, from its drop-down list, for Roku 3/2/1 users, you can choose to output “H.264 HD Video(*.mp4)” > “HD Video” that will satisfy your demand.

For Roku Ultra/Premiere+/Premiere/4 users, it would be much ideal for you to choose “H.265 Video(*.mp4)” under “Common Video” main category.

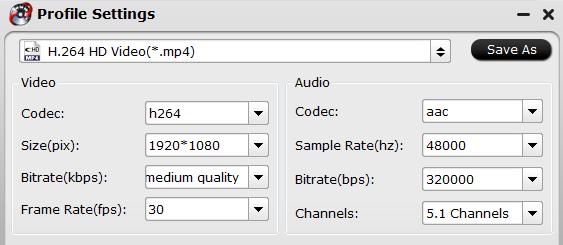
Tips: Click “Settings” on the main interface to open “Profile Settings” window, here, you can flexibly choose or specify exactly the parameters including video codec, resolution, bit rate, frame rate, audio codec, bit rate, sample rate, channels, etc as you like to get better output video and audio quality for Roku Ultra/Premiere+/Premiere/4/3/2.
Step 3: Begin the conversion process.
After all setting is completed, hit the “Convert” button at the right bottom of the main interface to begin the conversion process from unsupported video to Roku Ultra/Premiere+/Premiere/4/3/2 supported file formats and resolution.
When the conversion is finished, click “Open Output Folder” icon on the main interface to open the folder with generated files.