

With Pavtube Video Converter, you can easily convert videos, audios to optimum format for personal use by following the guide in steps below.
Pavtube Video Converter: Get Started
Start Converting Video to any video format with Pavtube Video Converter
The videos captured through phone/camcorder or downloaded from online have specific file formats which are not compatible with many devices. Therefore to make your recordings or video downloads compatible with most of the devices, they must be converted to some popular output format. With Pavtube Video Converter, the video can be easily re-encoded into any other popular video format.
Tip 1. Recorded/Downloaded user need firstly: Copy recorded/downloaded video to PC
Connect your phone/camcorder to PC Before start to convert recorded video, you need to connect your phone or camcorder where stored the video to computer wit USB cable or wirelessly. Once you have connected your camcorder/phone to computer, you can now export your recordings from camcorder/phone to PC. Save the exported video files at a known location in your computer. Or copy downloaded movies and videos to your PC.
Tip 2. If you are importing Tivo files to the sofware, make sure enter your Media Access Key, then hit the “OK” button to confirm.

Step 1: Launch Pavtube Video Converter
When you have saved all the recordings or video downloads on your computer, launch Pavtube Video Converter by double clicking its icon.
Step 2: Load videos to convert
After successfully launching the Pavtube Video Converter, you are now expected to load the files in it. You can either using the dragging method or the “File” method to import recorded/downloaded video to the software.

Step 3: Choose the output format
The main goal if the video conversion process is to change the video format. Pavtube Video Converter supports more than hundreds of file formats and you can choose any one from them according to your requirement. You can choose the file format from the “Format” section in the right pane. Then you can choose format from Common Video, HD Video, Samsung, TVS etc according to your requirements.

Tip 1. Customize output profile parameters
All formats are output with optimized profile parameters. You can still customize according to your own needs or preference. Hit the “Setting” button on the main menu to open the “Profile Settings” window, here you can adjust video/audio codec, size, bit rate, frame rate, sample rate, channels, etc. And you can compare the detailed information of the source video and the target video in the Task Information section. For example, you can adjust video size from 4K video to 1980*1080 for smooth playing/editing/sharing etc.

Tip 2. Merge files
Merge: Checking “Merge into one file” option on the main interface, you can combine selected files into one single file.

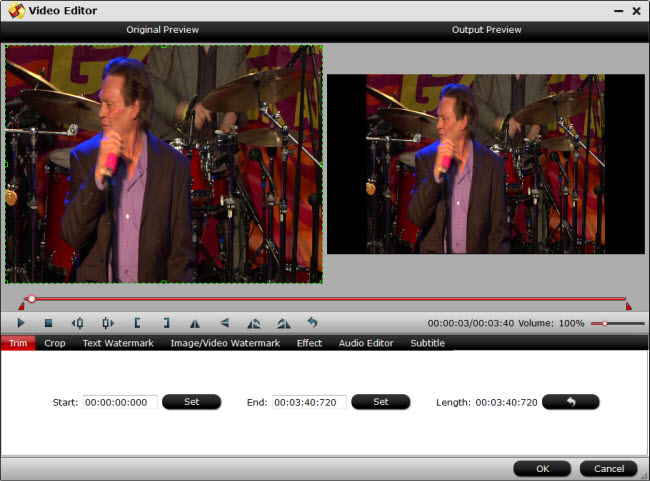
Tip 3: Edit the video (Optional)
If you have video editing need, you can use the crisp editing features offered by Pavtube Video Converter to trim, deinterlace, flip, add special effect, add text watermark, etc. However you can skip this step completely if you don’t want any editing to be done.
Step 5: Define the output folder
The next step is to specify the output folder. By default, Pavtube Video Converter allocates a folder for all the resultant files. However you can change the location of output folder according to your requirement.
Step 6: Start video conversion
When all the settings are done, you can start converting the video file by clicking on the “Convert” button. The conversion time will depend upon the length of the video being converted.
The conversion information such as Time elapsed, Time left, Generated size, and Estimated size will be listed on the window. You do not have to wait around for the conversion to complete, you can do your own work by checking “Shut down computer after conversion” option on the window to leave the program running. When the conversion is over, Click the “open output folder” to locate the converted files from the popup output directory.