

Got issues when streaming your videos to Nintendo Wii? What kind of errors did you meet? To solve such related troubles with Nintendo Wii, this guide below has some details on how to smoothly and easily stream any videos to Nintendo Wii from PC. Let’s now take a further learning below.
Expand knowledge: What can Nintendo Wii bring to us?
The Nintendo Wii is a great little game console, sure to occupy you for countless hours either playing Wii Sports or Twilight Princess. Going away from the “games only” approach of previous Nintendo consoles, the Wii is also a quite capable photo viewer. But what is most interesting, at least for this website, is Wii’s video playback capabilities. With a little bit of help, you too can play back your video files on the Wii.
Part 1. Nintendo Wii Video Converter Supported input and output file formats
Input Files:
.3g2, .3gp, .3gpp, .3gp2, .amv, .asf, .avi, .avs, .dat, .divx, .dv, .dvr-ms, .f4v, .flv, .m1v, .m2p, .m2t,.m2ts, .m2v, .m4v, .mkv, .mod, .mov, .mp4, .mpe, .mpeg,.mpeg1, .mpeg2, .mpeg4, .mpg, .mpv, .mts, .nsv, .ogg, .ogm, .ogv, .qt, .rm, .rmvb, .rv, .QuickTime, .trp, .tp, .ts, .vob, .vro, .wmv
Output Video Files:
MP4 (supported by iPad, iPod, iPhone, PSP, Apple TV, Gphone, Blackberry etc.), WMV (supported by Zune HD, Windows Mobiles, etc.), 3GP (supported by 3G mobile phones), FLV (suitable for online transfer), AVI (supported by Xbox 360, Archos, Creative Zen, Nintendo Wii, etc.), MPEG-1, MPEG-2, MKV, 3G2, SWF.
Output Audio Files:
MP3, AAC, OGG(Ogg Vorbis Audio), WAV(Nokia WAV Audio), M4A(Nokia M4A Audio), WMA(Windows Media Audio)
Part 2. Step by step on how Nintendo Wii works?
Step 1. Set Up Your Wii For HomeBrew and install WiiMC
The first thing you need to do is set up your Wii to use Homebrew, assuming you haven’t already. Don’t panic, it’s not complicated, thanks to something called Letterbomb. Now that you’ve got the HomeBrew Channel installed, it’s time to install WiiMC, a media player for the Wii you can use to play just about any file.
Step 2. Share Videos From Your Computer
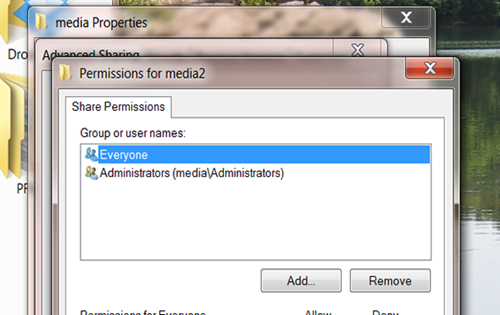
Next up, set up your PC to share the folder where you keep your videos. It’s not complicated – simply right-click the folder in Windows Explorer and click “Preferences“. From here you can find the sharing options. For the best results set up sharing to work with “Everyone“; this avoids complications later. Ideally you should provide only “read” access; on your home network there’s little risk to making a folder full of videos available to people with your network key.
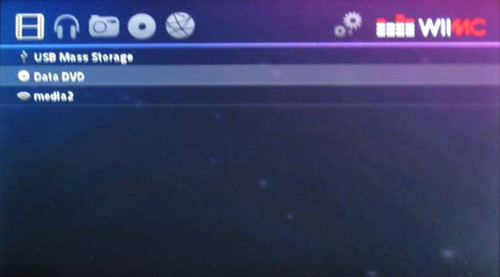
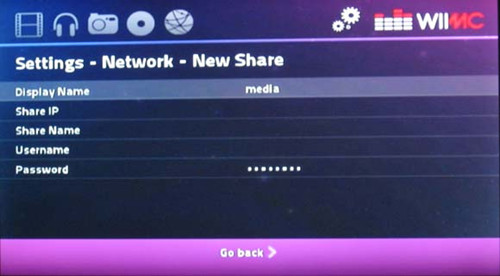
Step 3.Add Share to WiiMC
All done? Now open WiiMC on your Wii, then click the gears in the-right corner (beside the logo) to open the settings. Click “Network“, then “Add SMB Share“. Give your share any name you like, then enter the IP. By “Share Name“, enter the name of the folder you’ve shared. Type a username or password, unless you shared the folder with “Everyone” as outlined before.
Step 4. Profit!
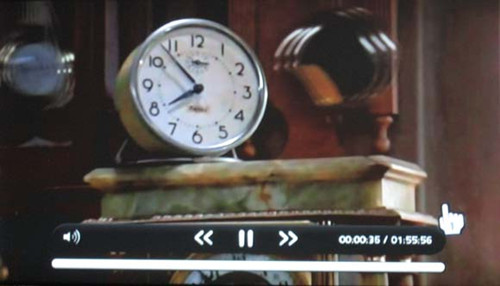
Do you see your videos? Congratulations! You can now stream videos from your PC to you Wii. Use this power only for awesomeness. HD videos will probably be too much for your Wii to handle, so don’t break out the Planet Earth videos you ripped from Blu-Ray. Most of the files on your computer will probably work, though, so give it a shot.
Part 3. How could we stream those incompatible videos to Nintendo Wii?
That’s exactly a good question! Though with the streaming steps above, how could we solve the issues when importing files to Nintendo Wii? Never mind, we have the Pavtube Video Converter for Windows/Mac, which could be a nice Nintendo Wii converter for all video formats. For faster conversion speed? Simple operation workflow? Various output choices supported? Not only for Nintendo Wii, but also available for others such like Plex media server, etc. Here you can find more functions that you deserved. Easy learning progress you can take as reference below:


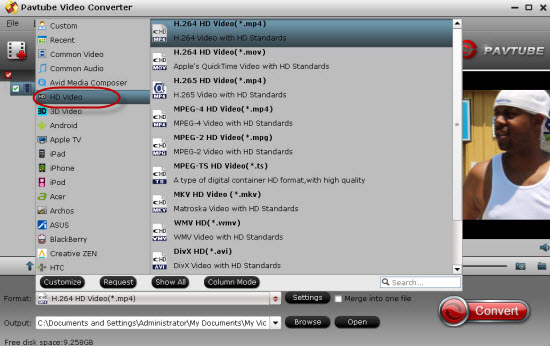
As soon as you successfully download and install this Nintendo Wii converter, load your files in after clicking the ‘Add files’ item on the main interface. Then come to the output list, here you can click any suitable ones for Nintendo Wii. For example, to preserve the high quality, we suggest you t select one on the ‘HD Video’ interface. Look at the screen shot below.
Optional Tips: Click the “Effect” button to open the Video Edit window to achieve editing MP4 like trim, crop, image, watermark, effect, subtitles and rotate and etc in the corresponding editing pane.
Click the “Setting…” button to open the Advanced Settings window to adjust the output video codec, resolution, bitrates, frame rate, aspect ratio, audio codec, channel, volume and etc in the advanced tab.
Go back to the main interface, when you finish the preparation work, the big red item ‘Convert’ is waiting for you choice to get started! What are you watching on your Wii? Let us know in the comments below, along with any other suggestions for playing videos on your Wii.


this is the first one i am going through..its really nice