Recording format for Camtasia recordings
For Camtasia Studio version 8.4 or later users, when you end a recording, the file will be saved in the .TREC format, while for earlier version of Camtasia Studio, the file extension will be saved in .CAMREC format.
These recording files can be used to build and produce video with the Camtasia Editor, but are not sharable videos in themselves. For those people who wish to share your recording, just convert the Camtasia recordings to AVI, after the conversion, you can conveniently play the AVI files on most Windows compatible digital media players such as VLC, Windows Media Player or import and edit the AVI files with popular video editing software such as Windows Movie Maker, VirtualDub, Avidemux, etc.
How to convert Camtasia recordings to AVI?
If you are looking for a powerful yet simple to use application to get the job completed, we highly recommend you our best Camtasia Video Converter – Pavtube Video Converter to you. The program has full support for both Camtasia recording .TREC and .CAMREC format. Thanks to its batch conversion mode, you can load multiple Camtasia recording files into the application at one time for conversion. With the program, you can easily convert Camtasia recordings files to AVI files with various different file resolution such as 4K/2K/HD/SD and compression codec including Xvid, Divx or DV .
Other functions of this powerful Camtasia Video Converter
- Convert Camtasia recordings to any other file formats such as MP4, MOV, MKV, FLV, H.264, H.265, 3GP, WebM, etc
– Convert Camtasia recordings to hot devices such as iPhone, iPad, Android phone/tablet, Windows phone/tablet, TVs, game consoles, etc preset profile formats
– Encode Camtasia recordings to popular NLE editing software such as Premiere Pro, Davinci Resolve, Avid Media Composer, Sony Vegas, etc favorable editing codec or formats.
– Output Camtasia recordings to popular online video sharing sites like YouTube, Vimeo, Facebook, Instagram best uploading formats and settings
For Mac user, please go to download the Mac version – Pavtube Video Converter for Mac to complete the same conversion on macOS High Sierra, macOS Sierra, Mac OS X El Capitan, Mac OS X Yosemite, etc.
Step by Step to Convert Camtasia Recordings to AVI
Step 1: Load Camtasia recording files into the program.
You can directly drag and drop the Camtasia recording files into the program or click “File” > “Add Video/Audio” or “Add from Folder” to load Camtasia recording files into the program.

Step 2: Choose output file formats.
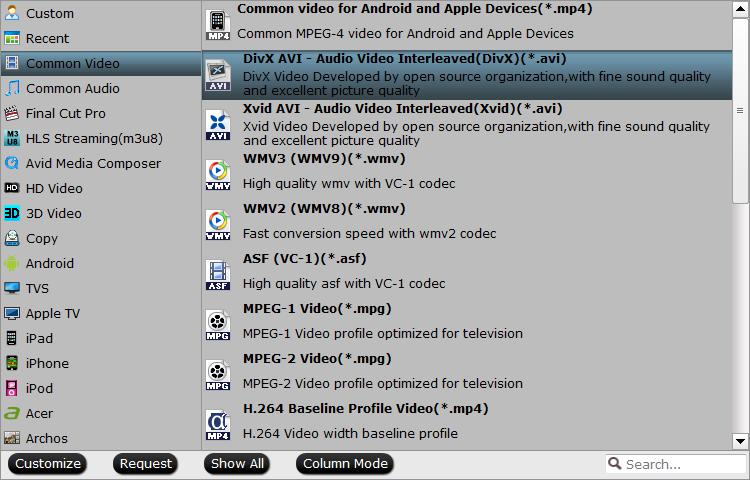
Click “Format”, from its drop-down option, choose one of your desired AVI file formats as the final output file format. Here, we choose “Divx AVI – Audio Video Interleaved(Divx)(*.avi)” under “Common Video” main category to output. You can also choose other AVI formats according to your own needs.

Tips: To get better output video quality and audio effect, you can flexibly adjust the output video codec, bit rate, sample rate, resolution, audio codec, bit rate, sample rate and channels in the program’s “Profile Settings” window.
Step 3: Edit Camtasia recording video(optional).
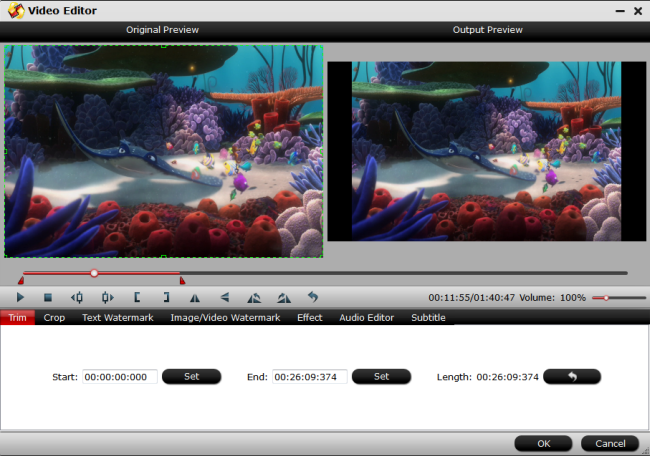
Check an item to active the “Video Editor” function, then click the pencil like icon on the top tool bar to open the “Video Editor” window, you can trim video length, crop video black bars, add watermark, apply special rendering effect, remove/replace audio in video, etc.

Step 4: Start the conversion process.
After all setting is completed, press the “Convert” button in the right-bottom to start the Camtasia recordings to AVI format conversion process.
When the conversion is over, click “Open output folder” to pop out the converted files, you will then have no problem to play, edit or share Camtasia AVI video on compatible Windows platform media players or video editing software.


