Have some AVI files shot with your camera/smartphone or downloaded from online video sharing sites and wish to load them into Camtasia Studio for some professional post editing workflow. From Camtasia Studio supported file formats, we can see that Camtasia Studio for Windows has included native import support for AVI files, however, you will fail to load AVI to Camtasia Studio for Mac which can only handle the following video and audio file formats:
– TREC (Camtasia Recording files)
– MOV (QuickTime movie), DV, MPEG-1
– MP4
– AIFF
-MP3
– WAC
– AAC (m4a)
Convert unsupported AVI for Camtasia Studio for Mac editing
To edit unsupported AVI with Camtasia Studio for Mac, you can use a third-party video conversion tool to transcode AVI to Camtasia Studio for Mac supported file formats listed above. Here, you are recommended to use MP4 (H.264/AVC) or MOV formats for editing with Camtasia Studio for Mac.
Although there are many applications can assist you to complete the conversion job, however, if you are looking for a powerful yet simple to use application to complete the job, we highly recommend Pavtube Video Converter for Mac (review) to you. The program has full support for all 4K/2K/HD/SD AVI files with the compression codec of Divx, Xvid, DV, H.264, etc. You can batch load multiple AVI files into the application for conversion at one time to save your precious time.
The program is pretty simple to use, you can easily convert AVI to Camtasia Studio for Mac playable H.264 or QuickTime MOV files with just few clicks. Import the AVI files into the application, set output file formats, hit right-bottom convert button, etc. To assist you to get the best output video and audio quality, you can flexibly adjust output video and audio profile parameters such as video codec, resolution, bit rate, frame rate, audio codec, bit rate, sample rate, channels, etc as you like.
Edit AVI with built-in editing options
Before loading AVI files into Camtasia Studio for Mac for some professional post editing workflow, you can complete some simple editing task with the versatile editing function offered by the application. You can flip or rotate video horizontally or vertically, rotate video clock-wise or counter-clockwise, trim or cut video to remove unwanted parts or segments, crop video to remove black edges or unwanted size area, add video/image/transparent text watermark, apply special rendering effect, change video picture effect, add external srt/ass/ssa subtitle to video, etc.


Step by Step to Convert AVI for Camtasia Studio for Mac Editing
Step 1: Add AVI files into the program.
Run the program on your computer and click “File” > “Add Video/Audio” or “Add from folder” to add AVI files into the program.

Step 2: Output Camtasia Studio for Mac supported editing formats.
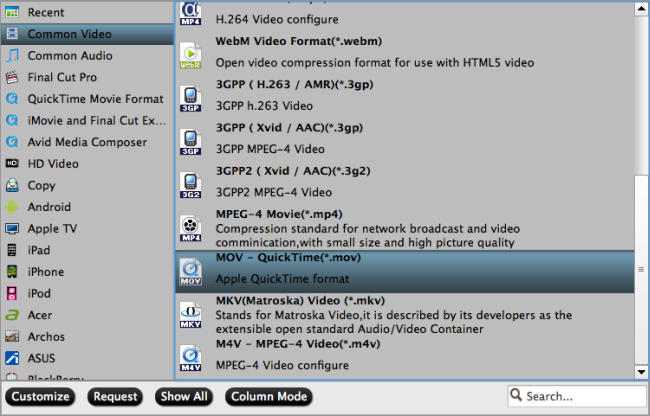
From the pull down menu of “Format” , then you will be able to select Camtasia Studio for Mac best compatible editing formats “QuickTime “MOV – QuickTime(*.mov)” under “Common Video” main category, you can aslo choose to output “H.264 HD Video(*.mp4)” under “HD Video” main category according to your own needs.
Tips: Click “Settings” to open “Profile Settings” window, here, you can change profile settings according to your own needs.
Step 3: Edit AVI video(optional).
Check an item to active the “Video Editor” function, then click the pencil like icon on the top tool bar to open the “Video Editor” window, you can trim video length, crop video black bars, add watermark, apply sepcial rendering effect, remove/replace audio in video, etc.

Step 4: Start the final conversion process.
After all setting is completed, click right-bottom “Convert” button to begin AVI video to Camtasia Studio for Mac best compatible editing format conversion process.
When the conversion is completed, you will have no problem to import AVI to Camtasia Studio for Mac for the best and professional post editing workflow.