GoPro has announced a new flagship Hero 7 Black action camera, which replaces the now discontinued Hero 6 Black, comes with new “Hypersmooth” electronic image stabilisation, which GoPro founder Nick Woodman called “the best in-camera video stabilisation in any camera, ever”. The camera shoots up to Ultra HD 4K resolution video at 60fps in MP4 container format with either H.264 or H.265 codec. After shooting some footage from a trip, you may wish to watch them on your big screen TV. The following article will show you 2 different ways to play GoPro Hero 7 4K video on TV.
Solution 1: Watch GoPro Hero 7 4K on 4K TV via HDMI cables
You can use HDMI cables (ver. 2.0 or higher) to connect your 4K-capable GoPro Hero 7 camera to a 4K compatible TV. Following are the detailed steps:
Step 1: Turn off the GoPro camera and 4K TV.
Step 2: Connect the GoPro camera to the 4K TV using the HDMI cable.
Step 3: Turn on the 4K TV and switch to the right HDMI input mode.
Step 4: Turn on the GoPro camera.
Step 5: GoPro Hero 7 4K videos will now be displayed on the 4K TV.
Solution 2: Play GoPro Hero 7 4K on 4K TV via USB
Nowadays, many 4K TV are capable of playback 4K content via USB connections. Just save the 4K video shot with GoPro Hero 7 camera to an external hard drive via computer by following the steps below:
Step 1: Insert the MicroSD card into the adapter and insert the adapter into your computer
Step 2: Press Windows key + E to open Windows Explorer. Your SD card will be on the left sidebar under the “Computer” section.
Step 3: Double-click on your SD card, and you should see two folders: DCIM and MISC.
Step 4: Now double-click on the DCIM folder. In that, you’ll see a folder named 100GOPRO. (Note – if you took more than 9999 pictures or videos, you’ll see 101GOPRO, 102GOPRO, 103GOPRO, etc. folders).
Step 4: Plug the external hard drive or USB flash drive to your computer
Step 5: From there you can drag and drop the files from your SD card to an external hard drive or USB flash drive.
Fix GoPro Hero 7 4K video playback issue on 4K TV
The GoPro Hero 7 can record 4K MP4 video using either the H.264 or H.265 codec, sometimes, if the 4K TV fails to install this two codec, you will fail to get the video played on your 4K TV. In that condition, you can download our powerful 4K Video Converter - Pavtube Video Converter. The program has perfect loading support for the 4K H.265/H.264 video shot with GoPro Hero 7, thanks for its batch conversion mode, you can easily load multiple GoPro Hero 7 video into the application for conversion at one time.
Related article: Upload GoPro Hero 5 4K to Dropbox | Play GoPro Video with Plex | Upload GoPro Hero 4K to Instagram
You can easily transcode GoPro Hero 7 4K H.265 video to H.264 video that’s adopted by most 4K TV. What’s more, just feel free to adjust output profile parameters such as video codec, bit rate, resolution, frame rate and audio codec, bit rate, sample rate, etc to produce the best playback settings for 4K TV.
For Mac users, you can switch to download Pavtube Video Converter for Mac to perform the same conversion on macOS High Sierra, macOS Sierra, Mac OS X El Capitan, Mac OS X Yosemite, etc.
Step by Step to Convert GoPro Hero 7 4K Video for TV Playing
Step 1: Load GoPro Hero 7 4K video.
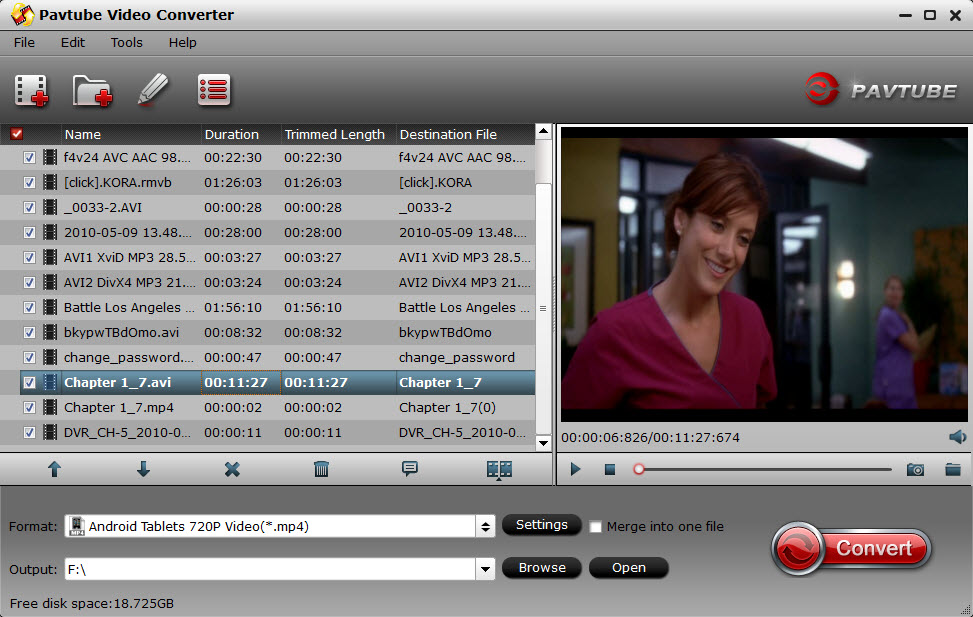
Download the free trial version of the program. Launch it on your computer. Click “File” menu and select “Add Video/Audio” or click the “Add Video” button on the top tool bar to import source GoPro Hero 7 4K video files into the program.

Step 2: Define the output format.
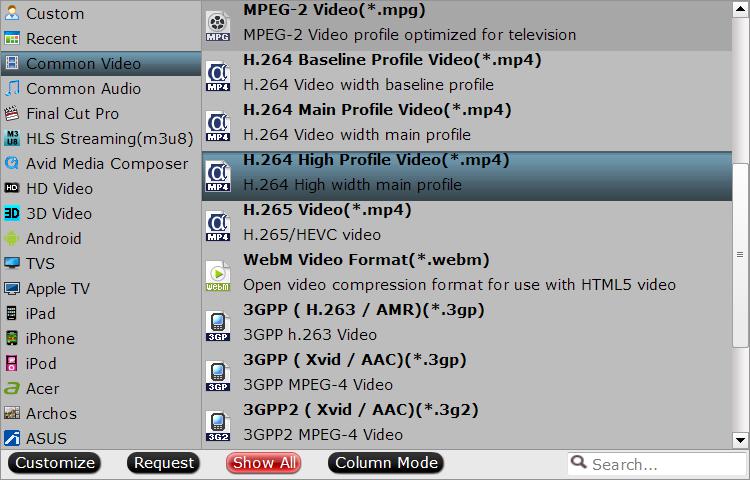
Clicking the Format bar, from its drop-down list, select most TV playable 4K content by following “H.264 High Profile Video(*.mp4)” under “Common Video” main category.

Tips: Click “Settings” on the main interface to open “Profile Settings” window, here, you can flexibly choose or specify exactly the profile parameters including video codec, resolution, bit rate, frame rate, audio codec, bit rate, sample rate, channels, etc as you like to get better output video and audio quality.
Step 3: Begin the conversion process.
After all setting is completed, hit the “Convert” button at the right bottom of the main interface to begin the conversion process.
When the conversion is finished, click “Open Output Folder” icon on the main interface to open the folder with generated files.


