

The long-awaited debut of high-end gaming VR has finally arrived. Oculus Rift’s Consumer Version 1 is now in the hands of consumers, and it has quickly become the most talked about piece of hardware among technology and gaming connoisseurs. More and more people start to choose Oculus Rift CV1 when they plan to get a 3D Glasses to enjoy 3D movies at home. For Oculus Rift CV1 owners, when you have a Oculus Rift CV1 in hand, do you think about the 3D movie source? Download from 3D YouTube site? Have you imaged that you can make 3D YouTube content for your Oculus Rift CV1 by yourselves with your favorite 3D YouTube movies? 
Want to know how to get it? OK, just read on the article and you will get the great solution. I think that you should know clearly that if we want to watch 3D movies on Oculus Rift CV1 with all kinds of movie sources, we have to need a third party software named video converter, which is designed to convert your YouTube source video to friendly 3D Mode.
Here, I strongly recommend Pavtube Video Converter for Mac for you guys. This powerful and integrated video software combines all the functions of 4K/SD/HD video in any formats to Oculus Rift CV1 on Mac with excellent 3D effect. If its 2D to 3D conversion function doesn’t attract you. It also enables you to adjust 3D effect and reset the output video size to get better 3D YouTube movies for Oculus Rift CV1. (read review)
Windows users should turn to the equivalent Windows version and Mac users please get freely the app at below and follow the steps to make 3D YouTube movies for Oculus Rift CV1.
Hot search: MKV to Gear VR , 3D to Zeiss VR One Plus , 2D to 3D MP4
Free download and get the best 3D video converter for Oculus Rift CV1: 

Other Download:
- Pavtube old official address: http://www.pavtube.com/video-converter-mac/
- Amazon Store Download: http://www.amazon.com/Pavtube-Video-Converter-Mac-Download/dp/B00QIBK0TQ
- Cnet Download: http://download.cnet.com/Pavtube-Video-Converter/3000-2194_4-76179460.html
How to get 3D Youtube Movies for Oculus Rift CV1 on Mac?
Step 1: Add 3D YouTube source movies
Launch the top 3D converter for Mac and add your movie source by clicking the “Load file(s)” or “Add videos” icon to import videos to the app. 
Step 2: Select a suitable output video format
Oculus Rift CV1 supports MP4, MKVI, etc format. You can click the “Format” bar and choose “MP4 Side-by-Side 3D Video (*.mp4)” or “MKV Side-by-Side 3D Video (*.mkv)” from “3D Video” profile list for your Oculus Rift CV1. 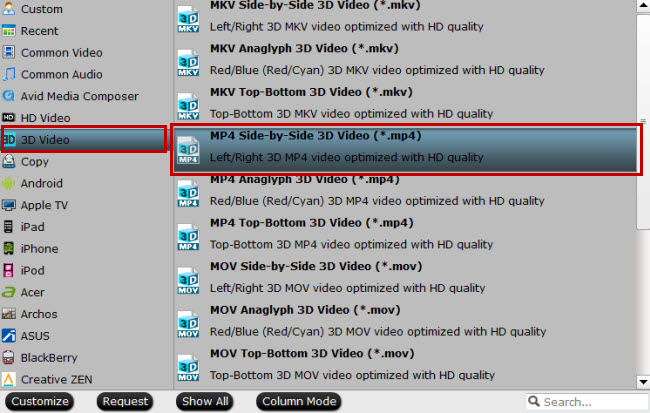
Tips: Settings
Oculus Rift CV1 claimed officially the specs of CV1 is 1200×1080 (per eye) but not by that much, at 1080×1200 per eye (to my best knowledge). With the CV1, the effective display resolution for watching movies on the biggest screen size that’s still comfortable is not quite 480p. So for high fidelity, you can downsize it to 960×1080 per eye or other lower resolution. You can adjust the size in “Settings” in Pavtube Video Covnerter and different bitrate, size leads different 3D effect in different movies. You also can adjust 3D depth in “Settings”. Try different 3D depth, you can get different 3D effect on CV1. 
Step 3: Start to transform all videos to 3D MP4 for Oculus Rift CV1
The last step is to press the big “Convert” button on the right to start converting all videos to Oculus Rift CV1 on Mac. The conversion takes a few minutes, if you don’t have time to wait, you can choose “Shut down computer after conversion”. Then your computer will be turned off automatically after the conversion is finished.
More from my site
 View 3D MTS footage for playback on Oculus Rift
 Top 5 Free VR Players for playing 3D Movies with 3D effect
 Change Movies to 3D Movies for HTC Vive
 Convert MKV to NVIDIA 3D Vision Player for Watching
 Creat and View 3D movies on Homido Virtual Reality Headsets
 Enjoy Sony RX10 II 4K XAVC S on Zeiss VR One with iPhone 6


