

The DJI Mavic Pro camera shoots 4K video (up to 4096 x 2160) at 30 frames per second in MOV wrapper with MPEG-4 AVC/H.264 compression codec. For Premiere Pro CC 2017/2015 or Premiere Pro CS6 users, you may wish to load the 4K H.264 MOV files into Premiere Pro for some professional post editing work. The following article will show you how to get a high quality and high performance workflow of Mavic Pro 4K with Premiere Pro CC 2017/2015/CS6.
Can Premiere Pro handle DJI Mavic Pro 4K video?
Although both Premiere Pro CC 2017/2015 and CS6 have native importing support for 4K H.264 MOV files recorded by DJI Mavic Pro. However, it is well known that H.264 is mathematically intense. It takes some serious computer horsepower to decode its compression. If you are fortunately to own a computer with powerful CPU, you can still get a high performance workflow. However, if your computer is year old and running very slowly, then the decoding of the 4K H.264 codec will obviously slow down the your editing machine’s playback performance considerably. Therefore, to have a smooth workflow of Mavic Pro 4K H.264 with Premiere Pro on slow computer, it would be ideal for you to transcode the intensive 4K H.264 to Premiere Pro CC favorable intermediate editing codec.
Transcode Mavic Pro 4K H.264 to Prores for Premiere Pro Editing
Benefits of editing Prores codec with Premiere Pro
Have no ideal which is the best Intermediate editing codec for Premiere Pro? Here, we highly recommend Apple Prores to you, as the successor of the Apple Intermediate Codec, the Apple Prores supports all current frame size including SD, HD, 2K, 4K and 5K, it provides real-time editing performance better than that of the compressed H.264 codec in Premiere Pro. What’s more, as an 10 bit codec, Apple Prores can process a lot of more color data and make the color correction process easier. While the H.264 is an 8-bit format shot by HDSLR, which means you are potentially compromising your effects and especially color correction and composing gradients.
Convert Mavic Pro 4K H.264 to Apple Prores codec
Here, you can get the job easily completed with a simple to use program called Pavtube Video Converter for Mac (review), which allows you to transcode Mavic Pro 4K to Apple Prores codec in various different file types including Apple Prores 4444, Apple Prores 422, Apple Prores 422 HQ, Apple Prores 422 Proxy and Apple Prores 422 LT. The produced Apple Prores 422 or 422 HQ files are significantly larger than the original H.264 files, therefore, if your computer doesn’t have enough storage space, it would be much ideal for you to choose the Apple Prores 422 Proxy or Apple Prores 422 LT file format which will produce a small resolution file. In addition, the Proxy file format will also ensure you a faster editing workflow on slow computer.
Don’t want to move the whole video clip into Premiere Pro for post editing, never mind, you can use the program’s built-in trim function to cut off unwanted parts. If there are blackbars around the video frame, you can use the crop function to remove them off. In addition, you can also add external subtitle to the video.
Pavtube Video Converter for Mac is pretty simple to use, any one can learn to use it in minutes. In addition, it keeps constant update with perfect support for the new Mac OS X El Capitan and macOS Sierra 10.12. In addition, the results produced by the program are pretty high quality, you can’t tell the difference between the converted video and the original 4K video.


Step by Step to Transcode and Convert Mavic Pro 4K for Premiere Pro Editing
Step 1: Transfer DJI Mavic Pro 4K video to Mac computer.
The DJI Mavic Pro 4K records footage on an SD card, you can remove the SD card from the camera, insert the SD card to a card reader, then plug in the card reader into your Mac computer SD card Port for transferring the video footage to your Mac local hard drive.
Step 2: Import DJI Mavic Pro 4K videos.
From “File”drop-down option, select “add Video/Audio”to add source DJI Mavic Pro 4K video files to the program.

Step 3: Select output file format.
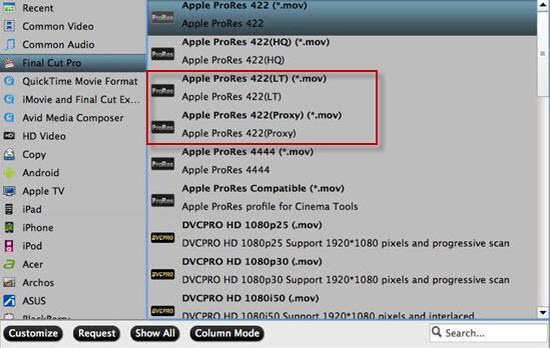
Click “Format”bar, from its drop-down list, select your desired Prores format such as “Final Cut Pro” > “Apple Prores 422(*.mov)” if your computer have enough storage space.

Tips: If your computer don’t have enough storage space or you wish to have a faster workflow with less effects applying, you can choose “Apple Prores 422(Proxy)(*.mov)” or “Apple Prores 422(LT)(*.mov)” to save much space storage capacity.
Step 3: Trim/Crop/Add subtitle to NX1 H.265 video.
Select an item on the main interface to activate the “Video Editor” function, in the opened “Video Editor” window, you can trim or cut off Mavic Pro 4K H.264 video length, crop to remove black frame or insert external subtitle to it.

Step 4: Start the conversion process.
Go back to the main interface, hit right-bottom “Convert” button to start to convert Mavic Pro 4K video to Premiere Pro CC 2017/2016/CS6 best favorable Apple Prores 422 or Proxy editing formats.
When the conversion is completed, feel free to import video to Premiere Pro 2017/2016/CS6 for professional post-production workflow on either powerful or slow computer.
More from my site
 Import DJI Inspire 2 H.265 to Premiere Pro
 Edit DJI Mavic Pro 4K Video with Final Cut Pro
 Play DJI Mavic Pro 4K Video on iPhone/iPad
 How to Compress DJI Phantom 4 Pro+ 4K to 1080p with No Quality Loss?
- Simple Guide to Upload DJI Phantom 3/4 videos to YouTube
 Best Way to Convert DJI Inspire 1 4K MP4/MOV to After Effects CC


