The Sony Bravia TV allows you to enjoy video, audio and image files on your TV from USB or DLNA devices, however, a lot of people complain that their Sony Bravia TV fail to open AVI files stored on USB drive as just the conditions listed below:
“Does anyone know any trick on how to get a Sony Bravia LCD to play avi files via a thumb drive ? Mine picks up the thumb drive but will only read mpg files, ie doesn’t see the avi files.”
“I just bought a 46″ Sony LCD bravia, and tried to see if it reads form my USB external Western Drive Hard drive. It reads my music and my photos, though with my movies it wont read it .. it reads the files though wont open them as it says “nothing to show” or something around those lines. it’s all dvd-rip movie files being .avi’s”
USB compatible file formats for Sony Bravia TV
To fix above listed question, we should be clear what are the USB compatible file formats for Sony Bravia TV. From Sony’s official support page, we get the following tablets:
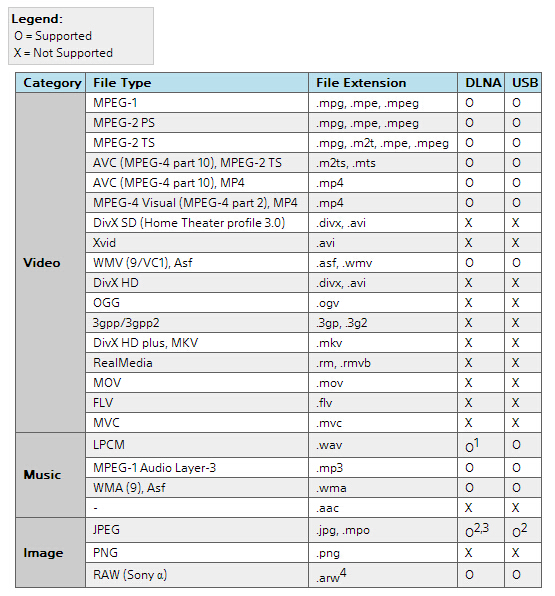
From above tablets, we can see that you can’t playback neither Divx AVI or Xvid AVI files on Sony Bravia TV via USB drive or DLNA server.
Convert AVI for Sony Bravia TV Playing from USB
To fix this format incompatible issue, you can use our powerful AVI to Sony Bravia TV Converter – Pavtube Video Converter to batch convert unsupported AVI files to Sony Bravia TV other USB compatible file formats such as MPEG-1, MPEG-2 TS, AVC (MPEG-4 Part 10), WMV (9/VC-1). For advanced users, you can then flexibly adjust other playback settings such as video codec, file size, bit rate, frame rate and audio codec, bit rate, sample rate, channels, etc in the program’s “Profile Settings” window to get the best output video and audio quality for Sony Bravia TV. For those people who have no idea how to tweak those settings on your own, you can use our program to directly output Sony TV preset profile formats with the optimal playback settings.
Related article: Play MP4 on Bravia TV from USB | Play 4K on Bravia 4K TV | Play MKV on Sony TV
Tips to play video on Sony Bravia TV from USB
Sometimes, even you’ve got the correct formats, you may still run problems when watching video from a particular USB drive. Here, make sure to format your USB drive to Sony Bravia TV compatible file system including FAT12, FAT16, FAT32 and exFAT. In addition, files larger than 4GB are only supported when using the exFAT file system. If the files are larger than 4GB, but the USB drive you are using is not formatted using exFAT32, you can compress video file size with no quality loss in the following ways:
– Trim or cut video to leave only your wanted specific part
– Crop video to remove black bars or unwanted size area
– Split large video into smaller parts by file size, count or length
For Mac users, you can switch to download Pavtube Video Converter for Mac to perform AVI to Sony Bravia TV conversion on macOS High Sierra, macOS Sierra, Mac OS X El Capitan, Mac OS X Yosemite, Mac OS X Mavericks, etc.


How to Convert AVI Files for Sony Bravia TV Playing from USB Drive?
Step 1: Load AVI files into the program.
Install and run this best AVI to Sony Bravia TV Converter, and then import the source AVI videos to it. To do so, you can directly drag & drop the files onto the main interface, or you can click the “Add video” icon on the upper left to locate the videos from your local disk. Note that batch conversion is supported, so you can add several files to the converter at one time.

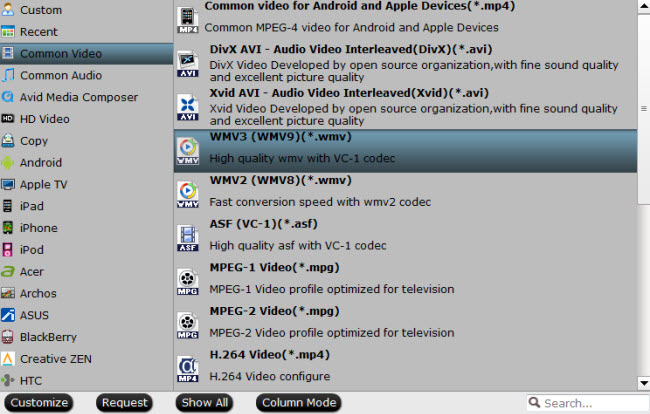
Step 2: Set output video format.
Click “Format” bar, from its drop-down list, select one of Sony Bravia TV playable file formats such as MPEG-1, MPEG-2 TS, H.264/MPEG-4 AVC, WMV9/VC-1.
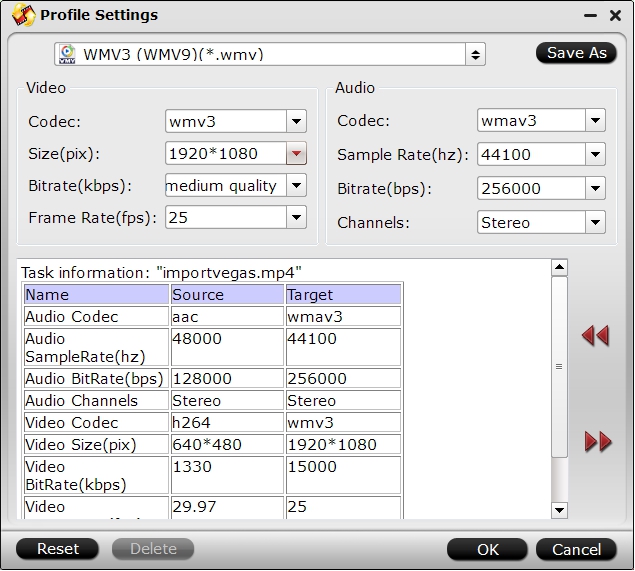
Then Click “Settings” on the main interface to open “Profile Settings” window, here, you can flexibly adjust the output profile parameters including video codec, resolution, bit rate, frame rate, audio codec, bit rate, sample rate, channels, etc as you like to get better output video and audio quality for Sony Bravia TV.
Tips: Have no idea how to adjust the advanced settings on your own, just directly output Sony TV preset profile formats under “TVs” main category as the screen displayed below:
Step 3: Compress files for Sony Bravia TV.
Trim video length
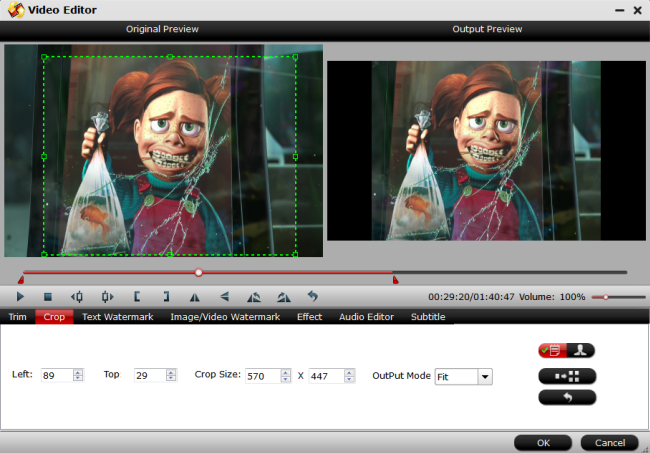
Open “Video Editor” window and switch to the “Trim” tab, you can drag the slider bars to include the segment you want to remain, click the left square bracket to set start point, and click the right square bracket to set end point when previewing the video or directly input specific values to “Start” and “End” box.

Crop video file size
The “Crop” facility enables users to get rid of the black edges and unwanted area of the image. In the video editor window, navigate to the “Crop” tab. Follow the below methods to crop selected video:
A: Crop video by dragging and dropping the crop frame. Simply move your mouse cursor to drag and adjust the green frame to desired position.
B: Crop video by setting values. There are “Simple Mode” and “Advanced Mode” under Crop feature.
In “Simple Mode”, you can customize values in the box of “Left”, “Top” and “Crop Size” to make your crop decision. Under “Advanced Mode”, there are four value fields: Left, Top, Width and Height. You can either type in specific values to the fields or adjust sliders to crop the source file.
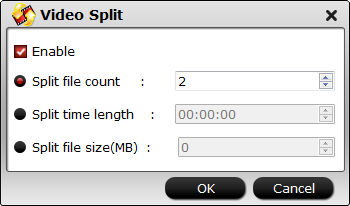
Split video into smaller parts
Click the split button on the file list to launch the Video Split window. Ticking “Enable” option, you can split the file by file count, time length, or file size.
Step 4: Begin the conversion process.
Go back to the main interface, click right-bottom “Convert” button to start AVI to Sony Bravia TV USB format conversion process immediately.
When the conversion is done, click “Open Output Folder” button to pop out the folder with converted files, then follow the steps below to play video/movie on Bravia TV from USB flash drive:
1. Connect the flash drive to the USB port of the TV.
2. Press the MENU button on the supplied remote. Press the UP or DOWN arrow button to go to Video, then press the select or enter button. The file or folder list will appear.
3. Press any of 4 arrow buttons to select a file or folder, then press the select or enter button. When you select a folder, select a file then press the select or enter button. Playback will start.