DLNA stands for Digital Living Network Alliance, it simplifies the process by establishing a single protocol that ensured DLNA-certified multimedia devices from different manufacturers would work together. A lot of people try to stream MKV files via DLNA, but they often find that the MKV files don’t work over DLNA just as the conditions listed below:
“I just got my BDP-S580. Most Avi work but I have a lot of problems with mkv. It seems that most MKV do not work over dlna but work fine if I put them same MKVs on usb hardware and play it that way. Is there a way I can get them to work through dlna?”
“I want to play MKV files via DLNA on my xxPFL7605 TV. Via TV I see all .avi files which are shared for playlist, but I don’t see any of my 1080p or 720p files, which are in .mkv format….PLEASE don’t tell me, that Philips doesn’t support those files, beacuse I really don’t know why I bought such “hi-tech” TV, if I must use HD players or hubs to play those files…”
Why fail to stream MKV files via DLNA?
The DLNA specification only allows for a few common video and audio formats. To make it more complicated, different implementations of DLNA support different codecs. And even supported formats may not work if the container, bitrate, or other details don’t comply with the DLNA spec.
MKV is not one of the media options that are categorized because it’s not a sanctioned format (not like WMV, MPEG, etc.). Besides, MKV is a flexible container format which can store just about anything (H.265, H.264, DivX, MPEG, any sort of audio, even menus and subtitles) while WMV, MPEG is more or less complete formats so they know what to expect while with MKV you really can’t tell without checking the contents itself.
Transcode MKV for DLNA streaming
To successfully streaming MKV files to DLNA certified devices, you will need transcoding software installed on your computer that is storing the MKV files. A very common one that many people use is Tversity which can transcode the file on the fly. However, a lot of people complain that they receive an error message when streaming MKV to DMP (Digital Media Player).
Fortunately, here comes some powerful third-party MKV conversion app. One of the highly recommended application is called Pavtube Video Converter Ultimate. It has full support for all 4K/2K/HD/SD MKV files encoded with various different video and audio compression codec. Thanks for its batch conversion mode, you can load multiple MKV video into the application for conversion at one time.
Related article: Play MKV on WD TV | Convert MKV to MP4 | LG TV MKV Solution
With this powerful yet simple to use application, you can easily transcode unsupported MKV files to your DLNA certified devices direct playback file formats such as MP4, MPEG, AVI, WMV, MOV, MPG, etc with perfect quality and super-fast conversion speed. To get better output video and audio quality, you can flexibly adjust output profile parameters such as video codec, bit rate, frame rate, resolution and audio codec, bit rate, sample rate, channels, etc as you like.
For Mac users, you can switch to download Pavtube iMedia Converter for Mac to perform the conversion on macOS High Sierra, macOS Sierra, Mac OS X El Capitan, Mac OS X Yosemite and Mac OS X Mavericks, etc.


|
Get Pavtube Video Converter Ultimate with 20% off discount, coupon codec: 45K2D47GJH
|
Step by Step to Transcode MKV for DLNA Streaming
Step 1: Load MKV video into the application.
Download the free trial version of the program. Launch it on your computer. Click “File” menu and select “Add Video/Audio” or click the “Add Video” button on the top tool bar to import source MKV video files into the program.

Step 2: Define the output format.
Clicking the Format bar, from its drop-down list, select DLNA certified device compatible playback formats such as “H.264 HD Video(*.mp4)” under “HD Video” main category. You can also choose other file formats according to your own needs.

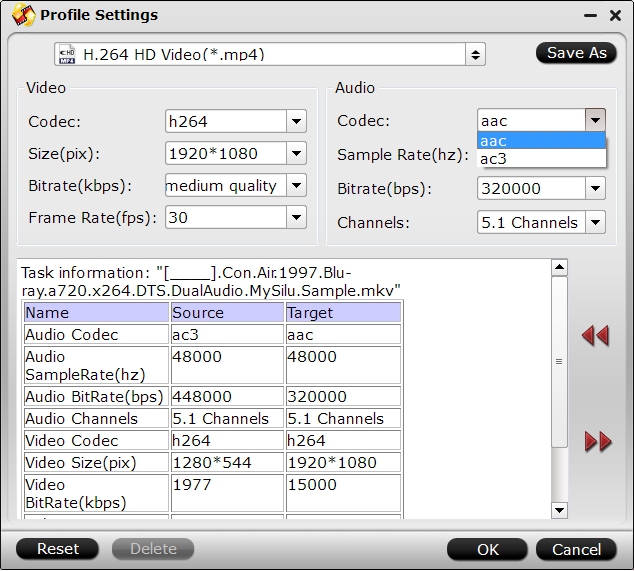
Step 3: Adjust output profile parameters.
Click “Settings” on the main interface to open “Profile Settings” window, here, you can flexibly choose or specify exactly the profile parameters including video codec, resolution, bit rate, frame rate, audio codec, bit rate, sample rate, channels, etc as you like to get better output video and audio quality.
Step 4: Begin the conversion process.
After all setting is completed, hit the “Convert” button at the right bottom of the main interface to begin the conversion process from MKV to DLNA certified devices supported file formats.
When the conversion is finished, click “Open Output Folder” icon on the main interface to open the folder with generated files. Then you will have no problem to stream MKV to DLNA certified devices.