

Perhaps you would like to edit MP4 files with Final Cut Pro or other Mac based applications on Mac OS X. However, MP4 files can’t be imported into the Final Cut Pro software, for the complex video codec.
“Please Help! I am having trouble to import some MP4 footages I have previously recorded to Final Cut Pro X. Is there any software to convert MP4 to ProRes for FCP?”
Or, you have some ProRes files and want to play in media player while few media players can support ProRes video unless you convert the ProRes to MP4 video. So how to convert MP4 to ProRes or ProRes to MP4? With ProRes video converter, you can easily get it. Now, let’s teach you how to convert MP4 to ProRes or ProRes to MP4 on Windows 10/macOS Sierra.
Pavtube Video Converter for Mac and Pavtube Video Converter a Mac video converter and a Windows video converter that can convert MP4 to Apple ProRes 4444, Apple ProRes 422 (HQ), Apple ProRes 422, Apple ProRes 422 (LT), and Apple ProRes 422 (Proxy) and also can convert ProRes files to H.264 MP4, H.265 MP4, MPEG-4, etc on Windows 10 and macOS Sierra. And, professional editing functions are provided to you: split, merge, trim, crop, add watermark, adjust video effect, edit audio and more.
Free download Pavtube video converter for Windows:


How to Convert MP4 to ProRes or ProRes to MP4 on Windows 10/macOS Sierra?
Step 1: Add video to this software
Click “Add video” button to upload MP4 source movie files or your ProRes from your computer. You can also directly drag the video files into the program directly.

Step 2: Choose ProRes format or MP4 format
Go to “Format” bar and choose “Final Cut Pro”. Here, there are several ProRes format and you can choose any one you want. If you are converting ProRes to MP4, just choose MP4 format from “Common Video” and “HD Video”.

Note: Apple ProRes 422 (HQ) have higher qualities. Apple ProRes 422 (LT) and Apple ProRes 422 (Proxy) have smaller sizes. You can choose according to your requirement.
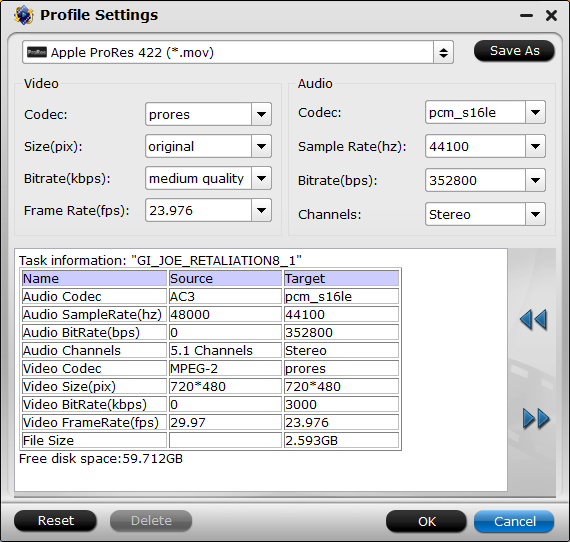
Tips: Click the “Settings” button and customize proper video/audio parameters including Video size, bitrate and fame rate and more. Please remember the file size is based more on bitrate than resolution which means higher bitrate results in bigger file size, and lower visible quality loss.
Step 3: Start the conversion
After all the settings done, the last thing is to click the “Convert” button at the bottom right corner to start to backup MP4 to Apple ProRes or convert ProRes to MP4.
After the process, generate the MP4 or ProRes files
More from my site
 Convert H.265 Files to Apple Prores 4444
 Ingest MKV to FCP X/Apple TV for Editing and Playing
  Sony Vegas for Mac Alternative: Edit and Convert Any Video and Audio Clips on Mac
 Convert Xvid to iTunes MP4 or MOV on Mac or Windows
 Three best Solutions for Watching AVI Movies in Mac (macOS High Sierra included)
- Final Cut Pro X:Importing Sony XAVC/XDCAM Media with Plug-in or Conversion


