

For Windows PC users, you might have recorded some AVCHD footage with your high definition Sony, Canon or Panasonic camcorder, when you try to open the default media player app – Windows Media Player 12 installed on your Windows 7/8.1/10, you may be disappointed to find that the Windows Media Player won’t play AVCHD files. The following article will offer beneficial tips and solutions to successfully get AVCHD files played on Windows Media Player.
Transfer AVCHD files to PC computer
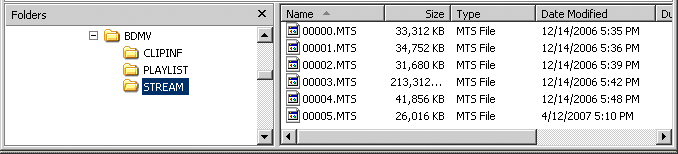
Before importing AVCHD to Windows Media Player, you will first need to transfer the AVCHD files from the camcorder to your PC hard drive. The AVCHD can be recorded on DVD disc, memory cards, non-removable solid-state memory and hard disk drives, when transferring AVCHD file from those file-based media to computer, you can either use Windows File Explorer, make sure the transfer the folder containing all related files and its subfolders. Keep the folder structure intact. When transferring files from AVCHD file-based media, transfer the BDMV folder and all its contents.
Convert AVCHD for Windows Media Player Playback
After searching for Windows Media Player supported file formats, we get the information that Windows Media Player can only handle M2TS files encoded with MPEG-2 compression codec, however, it is well known that AVCHD are MPEG-4 AVC/H.264 compression codec based files with .mts or .m2ts file extension. Therefore, to open AVCHD with Windows Media Player, you will need to perform a codec transcoding process.
Here, you can easily get the job done with a powerful yet simple to use application called Pavtube Video Converter. With the program, you can batch load multiple AVCHD mts/m2ts files recorded with Sony/Canon/Panasonic high definition camcorder for conversion at one time. After loading the AVCHD files into the program, you can rearrange the file order to let them displayed with the right order for merging/joining into one complete file.
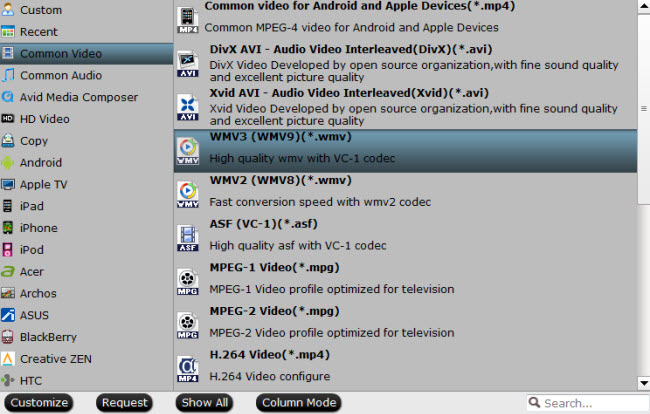
The program allows you to transcode AVCHD to Windows Media Player compatible file types in various different file formats. Here, we highly recommended you to choose the WMV file format, which is native supported by Windows Media Player without installing extra codec. Here, you can produce 2 types of WMV files with our program, if you wish to have a fast conversion speed, you can ouput a WMV file with WMV2 (WMV8) codec, if you care much about output file quality, just select the “WMV3(WMV9)(*.wmv)” file which helps to produce a high quality wmv file with VC-1 codec.
Related article: Play MKV with Windows Media Player | Watch MP4 with Windows Media Player | Free Convert WMM files to AVI
Deinterlace 1080i AVCHD video
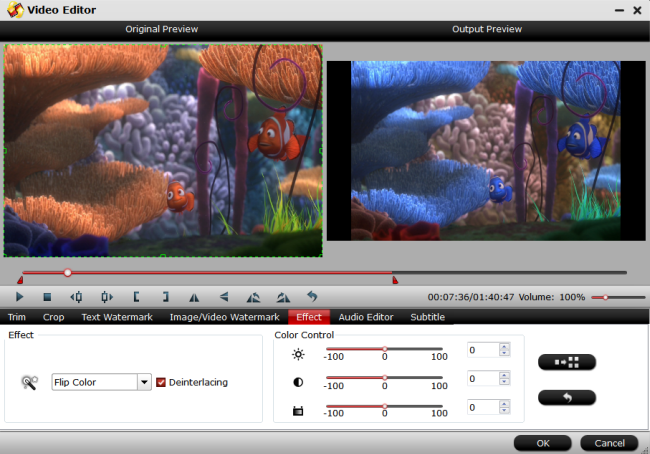
Some of the AVCHD footage that you shot with your high definition camcorder may be 1080i interlaced video, which can exhibit motion artifacts known as interlacing effects. These artifacts may be more visible when interlaced video is displayed at a slower speed than it was captured, or in still frames. Here, you can fix change interlaced video into the progressive form with the deinterlaced function offered by the program.


How to Batch Convert AVCHD for Windows Media Player Playback?
Step 1: Load AVCHD video files.
Download the free trial version of the program. Launch it on your computer. Click “File” menu and select “Add Video/Audio” or click the “Add Video” button on the top tool bar to import source AVCHD video files into the program.

Tips: Click the up or down arrow on the main interface to rearrange the AVCHD file into the correct order, and then check “Merge into one file” option to join the separate AVCHD files into one file.

Step 2: Define the output format.
Clicking the Format bar, from its drop-down list, select Windows Media Player best supported WMV files under “Common Video” main category.
Output fast conversion speed WMV2(WMV8) file

Output high quality WMV3 (WMV9) file
Step 3: Deinterlace 1080i video.
Select an item on the main interface to activate the “Edit” menu, then click the “Edit” icon on the tool bar to open the “Video Editor” window, switch to the “Effect” tab, check off “Deinterlacing” option to transform the interlaced video into a progressive form to keep good image quality.
Step 4: Begin the conversion process.
After all setting is completed, hit the “Convert” button at the right bottom of the main interface to begin the conversion process from AVCHD to Windows Media Player supported WMV file format.
When the conversion is finished, click “Open Output Folder” icon on the main interface to open the folder with generated files. Then you will have no problem to play the WMV files with Windows Media Player.
More from my site
 Free Export Windows Movie Maker Files to MP4 on Windows
 Convert AVCHD to Prores 422/422 HQ/422 Proxy/422 LT
 Good Tips on Making Sony Vegas Handle Raw MXF Files with Multi-track
 Pavtube Video Converter Published New version v4.9.0.0 – Support H.265 NVIDIA® CUDATM & AMD
 How to Convert MXF to MOV with No Quality Loss
 How to Convert MXF on Mac (macOS 10.12 Sierra included)


