The free open-source VLC media player can not only work as a portable and cross-platform media player, a free video converter but also a versatile video editor which helps you to complete some simple video editing task such as video rotating, cutting, merging, etc. The following article will show you the detailed steps to rotate, merge and cut video with VLC media player.
How to free Rotate/Cut/Merge Video with VLC?
Rotate video with VLC
For those people who have captured a video on your smartphone or camcorder, when you try to play them on your computer with VLC or other media player, you may find that the video is rotated 90 degrees. To let it display with the right angel or orientation, you can follow the steps below to rotate the video in VLC media player.
Step 1: Now open the video that you want to rotate with VLC Media Player.
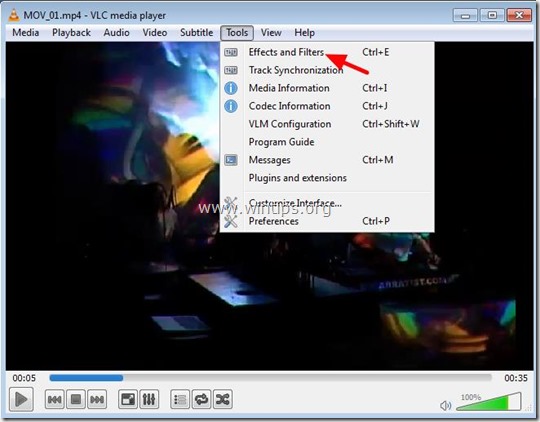
Step 2: In the VLC Media Player main menu, go “Tools” > “Effects and Filters”.
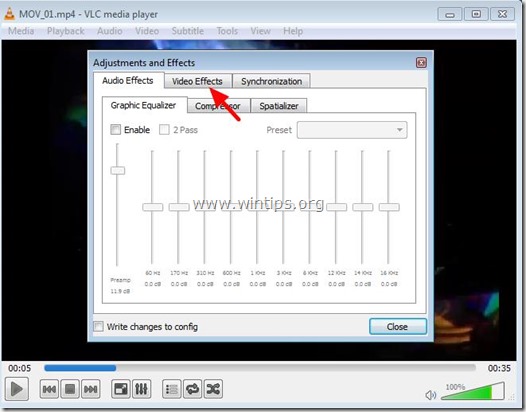
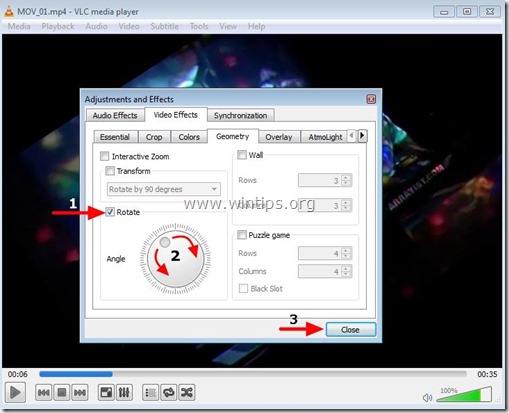
Step 3: In “Adjustments and Effects” window, choose the “Video Effects” tab.
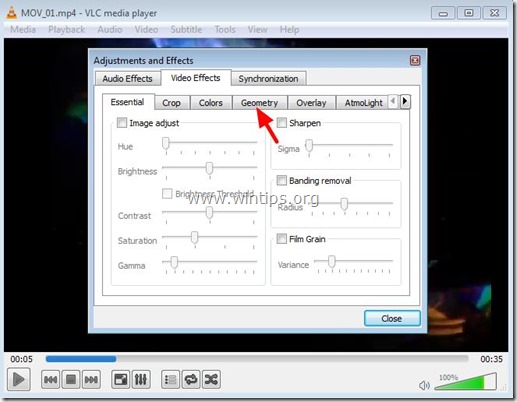
Step 4: In “Video Effects” tab, choose “Geometry”.
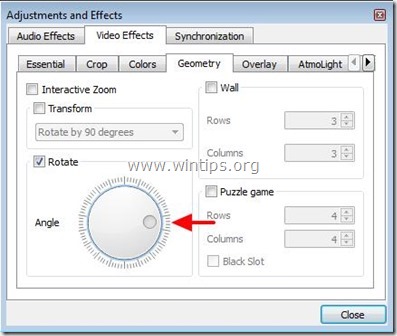
Step 5: In “Geometry” options:
a. Click the “Rotate” box to enable rotation.
b. Then move the rotator (drag with your mouse) to the left (or right) until you specify the angle that you want to rotate your video.
c. Press “Close” to exit “Adjustments and Effects” settings.
Example: To rotate a video by 90 degrees Right: move the rotator to the Right at 90 degrees angle.
Now you can view and play your rotated video with VLC Media player (only) in the specified angle.
Merge video with VLC
Looking for a free tool to join multiple video into one single file, the good news is that you can combine multiple video clips and output them into a single file with VLC’s built-in command-line features.
Before start, you need two clips with identical encoding, so begin by transcoding the files if necessary. To transcode in VLC, open the “Media” menu and pick “Convert/Save.” Add one clip, press “Convert/Save” and pick a format from the Profile list. After VLC finishes, convert the second clip. You can also use another video editor to convert your clips, if you prefer.
“Shift-right-click” in the Windows folder containing your video clips and pick “Open Command Window Here” to open a Command Prompt.
Type the following command, replacing the components in brackets:
“[Location of vlc.exe]” [first_clip.ext] [second_clip.ext] -sout “#gather:std{access=file,dst=[new_name.ext]}” -sout-keep
For example, if you have VLC installed in the default directory and you want to combine two video clips named 1.avi and 2.avi into 3.avi, your complete command would read:
“C:\Program Files (x86)\VideoLan\VLC\vlc.exe” 1.avi 2.avi -sout “#gather:std{access=file,dst=3.avi}” -sout-keep
Press “Enter” and wait while VLC merges the files. When VLC’s status bar appears blank, rather than showing the name of one of the clips, the program has finished.
Close the VLC window before you try to open your new file, or the new file won’t merge correctly, causing an incorrect time count or corrupted video.
Cut video with VLC
The process to cut videos is very simple, but if you are looking for an even easier way to cut out small video segments then VLC media player can be your best choice.
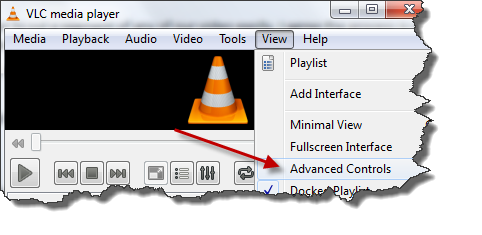
Step 1: Launch VLC media player and activate Advanced controls located under the View menu.
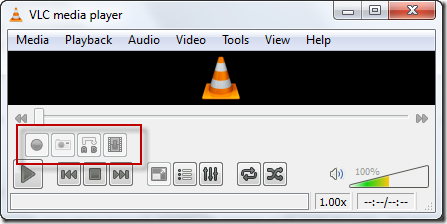
Step 2: As soon as you activate the advanced controls you will see four extra buttons above the normal play/pause button. We will use the first button from the left called the record button. Once you have these controls activated add your video. You can use Open File located under the Media menu, but as you know I always prefer drag and drop method.
Step 3: Basically we will not be cutting the video here; we will rather play the video and record the segment using the built-in VLC decoder. So seek to the position you want to start your recording and press both play and record button simultaneously.
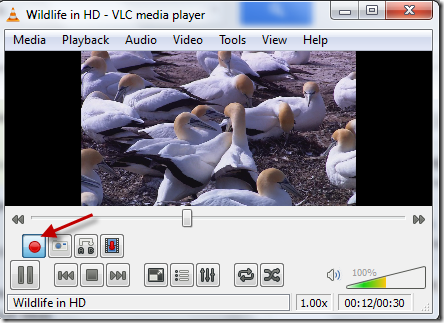
Tip: You can use the Frame by frame button (the last button from the left in advance control) to navigate to the exact frame you want to start recording.
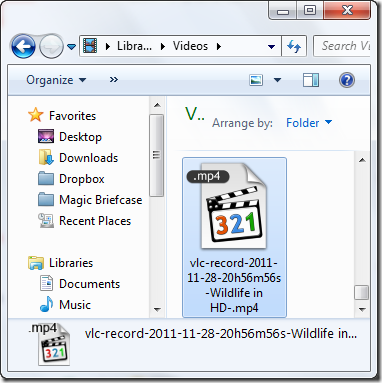
Step 4: Again press the Record button when you want to stop the recording. The clip will be automatically saved as an MP4 media file type in your Libraries/Videos folder in Windows 7. I am not sure about Windows XP but you can search for it in either My Documents or My Videos. Similar for the other operating systems.
All in one solutions to edit video with Pavtube Media Magician
For those people who wish to accurately trim or cut video clips frame by frame, edit specific video without rendering process or apply other special effects to video, a more powerful and comprehensive video editing software called Pavtube Media Magician is highly recommended to you.
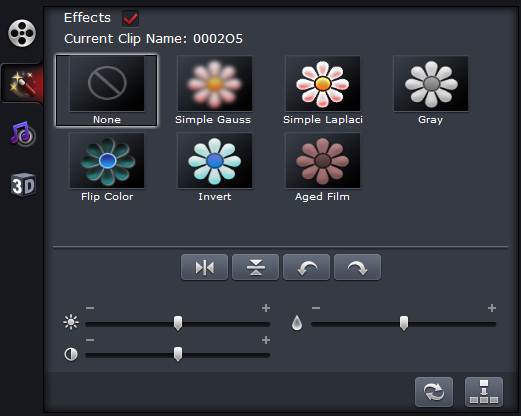
This time-line oriented editing tools helps to accurately trim and join clips frame by frame. If you import MTS/M2TS files with the same codec, you can output as the original file format or MKV without rendering. Besides the video trimming or merging function, you can also use the program to change the output video picture effect such as brightness, contract, saturation, add special effects like Aged Film, Simple Gauss Blur, etc or add 3D effect to 2D video.
For your convenience, the program is available on both Windows and Mac platform (get Mac version). The program is pretty simple to use, any one can learn to use it in minutes. What’s more, the results produced by the program are pretty high quality, you can’t tell the difference between the result video and the original source video.
Free download Windows version


Pavtube Media Magician for Mac


How to Edit Video with Pavtube Media Magician?
Step 1: Load source video files.
Drag and drop the video files to Timeline, then you can manage it into movie. This function makes splitting movies, merging video clips, trim video clips at just the right moment easy. Now enhanced with frame accurate seeking, you can split/cut movies at a very precise point.

Timeline includes three parts: Tools Bar, Vernier, Movie track.
Split: Divide a movie clip into two.
Select a video clips from the Movie Track in Timeline, then move the Vernier to the time point or position you want to split and then Click  , after that, one video clip will be divided into two.
Frame Accurate Splitting/Cutting: Just double click the video in Timeline and view it in Player, then use the Previous Frame or Next Frame Button to make sure you get the correct point. Then click split button to cut it.
Trim: Set the starting time or ending time to cut off unwanted parts.
Move your mouse to the left and right borders of the clip, you will find the mouse turns into a Square Bracket, now you can drag to change the starting time or ending time of the clip to finish Trim function.
For frame by frame trimming, suggest you to use Vernier to locate the starting and ending frame of the clip and then click Split to cut into two parts, after that, you can click “Delete” to delete the part you don’t want.
Merge: Merge the multiple files into one file.
When you drag and drop multiple video files from media library to Timeline, they will be merged into one file in output. It’s a way to create multimedia slideshow.
Lossless Merging: (for lossless output)
If you wish to join the MTS files in the AVHCD folder without encoding, this video joiner program provides a way to let you merge all the MTS files into one without touching on the video and audio.
Just drag all MTS files you want to merge to Timeline, then choose the lossless output Original in the output window.
Tips: All the MTS files you drag onto Timeline should be in same codec, otherwise it will failed to output the file.
Video Effects
Video Effects function can only be used for movie that exports for conversion. When such a movie is put in Timeline, you can click “http://image.pavtube.com/img/media-magician/clip_image009.jpg” to adjusting brightness, contrast, saturation, flip and rotate video and add other special effects like Simple Gauss Blur, Aged Film, Gray, etc. The effect can be showed in the media player.
 –reset to default settings.
 –Apply to all clips on Timeline.
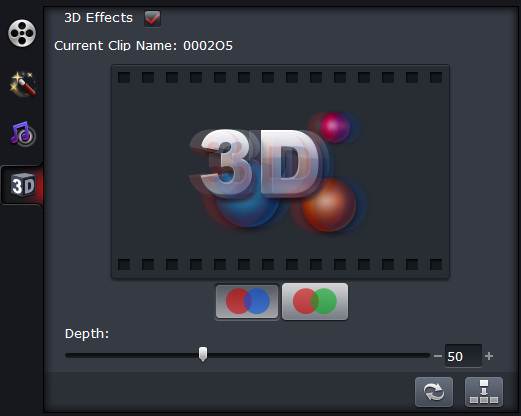
3D effects
Currently Pavtube only support Red-blue and Red-Green effects. Check the 3D effect box, and choose red-blue button or red green button, then it will add 3D effect in output file.