For Mac users, there are many times that you will come the need to trim or cut the QuickTime MOV files, you may wish to cut out a small clip from a long video, trim off the blank content in the beginning and end of the video or cut any of your any frames from the QuickTime video and then join them together for further usage. The following article will show you how to trim or cut QuickTime MOV files on Mac quickly with 2 effective tools.
Trim or cut QuickTime MOV Files with Pavtube Video Converter for Mac
Why choose Pavtube Video Converter for Mac
- Batch load multiple QuickTime MOV files for trimming or cutting at one time
– Trim or Cut QuickTime MOV files to output the needed parts without trailers or advertisements.
– Easily trim or cut QuickTime MOV files by dragging the slider bars, clicking the square bracket or setting the cutting values.
– Customize video by modifying clips order, adjusting output video profile parameters such as video codec, file size, bit rate, frame rate, audio codec, bit rate, sample rate and channels.
– Output trimmed QuickTime MOV file to the same file format without re-encoding or new file format for better playing, editing and sharing.
– Perfect compatibility with the new macOS Sierra, Mac OS X El Capitan, Mac OS X Yosemite, etc
– Quite simple to use. Anyone can learn to use it in minutes
– Very stable during the conversion process, no sudden crashes
– Produce high quality conversion results with better video/audio quality
Related article: 5 Ways to Cut AVI Video | Free Cut YouTube Video online | Top 7 MKV Cutter


Step by Step to Trim or Cut QuickTime MOV on Mac
Step 1: Import QuickTime MOV video.
Download the free trial version of the program. Launch it on your computer. Click “File” menu and select “Add Video/Audio” or click the “Add Video” button on the top tool bar to import QuickTime MOV video files into the program.

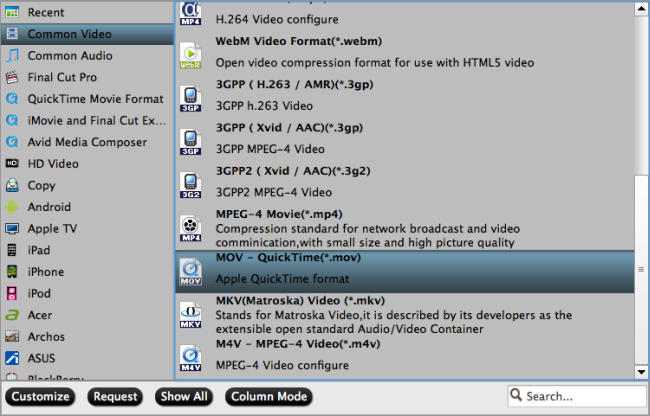
Step 2: Define the output format.
Clicking the Format bar, from its drop-down list, select one of your desired file format to output, you can choose to preserver the original QuickTime file format, or output QuickTime file to any of your desired digital file formats.
Step 3: Trim or cut QuickTime MOV file.
In the video editor window, choose the “Trim” tab and this tab is selected by default when the editing window appears. You can use the trim function to cut off unwanted parts from start and end. You can either drag pointers on the process bar or set exact time point in Start and End boxes to set to leave only your wanted parts.

Step 4: Begin the conversion process.
After all setting is completed, hit the “Convert” button at the right bottom of the main interface to begin QuickTime MOV video trimming or cutting process.
When the conversion is finished, click “Open Output Folder” icon on the main interface to open the folder with generated files. Then you can get a short QuickTime video with only your unwanted parts or segments.
Accurately trim or cut QuickTime MOV on Mac with Pavtube Media Magician for Mac
Sometimes, there may be many parts that you want to take from your QuickTime MOV video frame, the fact is that most Mac video cutter tool on the market only gives you the chance to trim off a specific part. Fortunately, here comes Pavtube Media Magician for Mac, which allows you to directly drag the QuickTime MOV file on its timeline, you can then easily cut any of your unwanted parts or frames accurately, trash undesired frames and join your wanted frames together.
Besides cutting QuickTime MOV files, you can also use the program to convert the QuickTime MOV video for playing on Mac, iPhone, iPad, stream to Apple TV or directly upload to YouTube. You are also enabled to optimize your video by adding 3D effect, adjusting/adding effects, etc.

Step by Step to Trim or Cut QuickTime MOV Files on Mac Frame by Frame
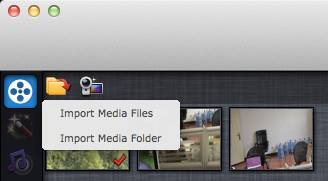
Step 1: Import QuickTime MOV files from hard drive.
To import QuickTime MOV files from hard drive to Media Magician, proceed as either way follows:
a. Drag and drop source files to source area directly
b. Click folder button to choose import media files, or import the whole folder.
Step 2: Trim QuickTime MOV video frame by frame on the timeline.
The program allows you to manage movies using a timeline, drag and drop the video files to Timeline, then you can manage it into movie. This function makes trim video clips at just the right moment easy. Now enhanced with frame accurate seeking, you can cut movies at a very precise point.
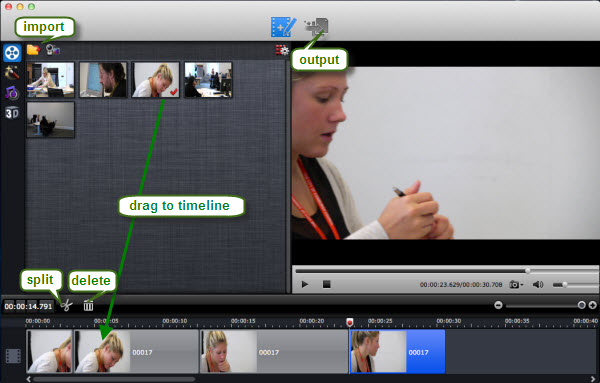
Just double click the video in Timeline and view it in Player, then use the Previous Frame or Next Frame Button to make sure you get the correct point. Then click split button to cut it.
For frame by frame cutting, suggest you to use Vernier to locate the starting and ending frame of the clip and then click Split to cut into two parts, after that, you can click “Delete” to delete the part you don’t want.
Step 3. Select output format.
Choose “Output” in the main interface to switch to Output window. Media Magician comes up with massive output formats (AVI, WMV, MKV, MPG, H.264, TS, MOV, MP4, etc).
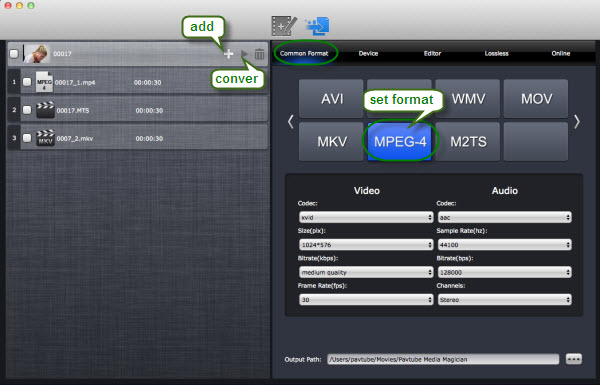
Step 4. Convert Trimmed QuickTime MOV video to desired format.
Click “Plus” icon to add conversion task before selecting output format. Click on the triangle on the task to get the app start trimming and converting QuickTime MOV video to your desired file format.