“How would you merge the MXF files? Canon XF camcorders have 2GB limit for MXF video. While make a long recording, the clip is save in multiple files. Is there any will the joined file play smoothly without dropped frame or choppy problem?”
“I recently purchased a Canon XF300 camcorder to use with my Magix Video Pro X system. I assumes the XF300 would create one huge video file until I shut off the machine. Instead it makes several up to 2 GB MXF files and every time I start/stop the camcorder a new video file is created. I use the XF utility to transfer just the video files from my CF card to my hard disk. When I combine them into a file via Canon utility I get one track of mono sound. What’s the problem? How do I fix that?” 
XF Utility software provides a simplified first step in the process of managing and playing back your clips, without the use of full-blown NLE software. The Canon XF Utility lets you select multiple clips and merge them into one. You can select all the clips with Ctrl+A, or individual clips by ctrl-clicking the thumbnails of the clips you want, then choosing “Export to MXF” from the Edit menu and picking the “Merge all clips” option.
However, as mention above, some users met the problem while merging the MXF clips via XF Utility that can not be imported to the editors for post-production. Here is another way for your reference. Pavtube MXF MultiMixer can perform the task for you in the meantime without problem. This professional program not only can merge single MXF files from the same camera to an integrated one, but also can merge MXF files from different cameras like XF300 recorded MXF and C300 recorded MXF files into one. Besides, it has multiply preset output formats for the users to choose for editing, such as NLEs.


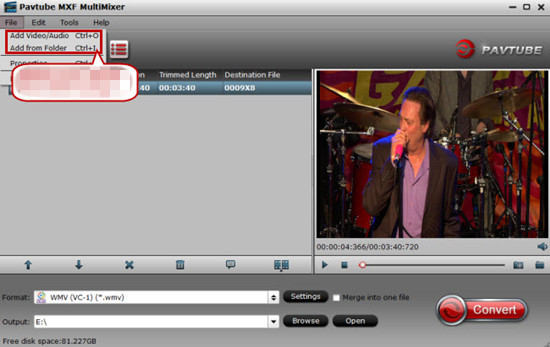
Step 1: Launch the MXF MultiMixer on your PC, and then click the “Add video” button to import your MXF files directly. In order to import several files at one time, you can click “Add from folder” button.
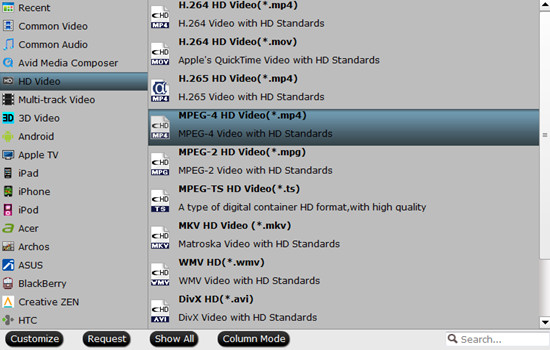
Step 2: Click the “Format” bar to get the drop-down menu and you can get “HD Video”, here we suggest you to choose “MPEG-4 HD Video (*.mp4)” as the best output format for editing in Magix Video Pro X.
Step 3: Click “Settings” button to customize the output video and audio settings by yourself. But if you are not good at it, you’d better use the default parameters, they will ensure you a good balance between file size and image quality basically. You can change the resolution, bit rate, frame rate as you need.
Step 4: Before conversion, when everything is done, tick off “Merge into one file” next to “Settings” button. Then click “Convert” button to start conversion.
Conclusion: As soon as the conversion is complete, you can click “Open Folder” button to get the generated files. Later, transfer the merged MXF files to Magix Video Pro X for editing.