Summary: Have you failed import video to YouTube? Or you upload video to YouTube with bad quality? Don’t worry, this article will give you the best video format and size for YouTube and make you be a good video creator.
Have you ever received an “invalid file format error message when you’re uploading”? Not sure which is the best format to save or upload your YouTube video?
Want to know what video sizes are best supported by YouTube so that you can upload videos to YouTube without any problem?
Calm down first, let’s talk about something more about YouTube.
Resolution
It’s recommended to upload videos in HD for quality playback. Obviously, you can shoot a video with your phone camera in one of the minimum resolutions like 240×180, but such video on YouTube will look quite bad. 1920*1080 are high recommended here.
Aspect Ratio
Use one of the standard aspect ratios: 4:3 or 16:9. When the video is uploaded to the site, YouTube will either leave it as-is (for 16:9) or add vertical black bars (for 4:3). Don’t add horizontal black bars before uploading a video. If you do it, black bars will be all around your video and it will look rather horrible.
Frame Rate
If it’s possible, you’d better keep an original frame rate. Usually videos have the best quality if there frame rate is between 25-30 fps. Since spring 2014 YouTube supports 60fps frame rate that video gamers begged for. Some modern cameras give even 2000 fps, but YouTube doesn’t support such a quality yet.
Codec
Most suitable codecs for YouTube are H.264, MPEG-2 or MPEG-4. These codecs are used in most modern videos, so you’ll hardly need to change this parameter.
Format
YouTube is a video streaming site. So if you want to upload an audio track, a slideshow, a PowerPoint presentation or a cartoon to YouTube, you should encode it into a video format. YouTube states that the best format to use is MP4 (standard, HD and Ultra HD 4K quality). It’s not as heavy as AVI and provides better quality than FLV. WMV HD format seems to lose its quality, while 3GP and SWF resolutions are too small.
Hot Search: Play YouTube with VLC | Fix YouTube Video | iMovie videos on YouTube
HOW TO TRANSCODE & UPLOAD VIDEO TO YOUTUBE?
If you have a multimedia file in an unsupported format from your camera, then you can convert video into MP4 and change the resolution as 1920*1080, then you have the perfect video quality on YouTube.
Pavtube Video Converter for Mac(read the revidew) is a all-in-one software help you convert SD/HD/4K UHD videos to YouTube supported video formats for uploading and sharing.

Other Download:
- Pavtube old official address: http://www.pavtube.com/video-converter-mac/
- Amazon Store Download: http://www.amazon.com/Pavtube-Video-Converter-Mac-Download/dp/B00QIBK0TQ
- Cnet Download: http://download.cnet.com/Pavtube-Video-Converter/3000-2194_4-76179460.html
Step 1: Input source video to the program.
Click “File” menu and select “Add Video/Audio” or “Add from folder” to import source video to the application.
Step 2: Define output format.
After checking the supported format that those video sharing websites, you can find that H.264 is the best codec to compatible with YouTube, go to the “Format” bar and choose “HD Video” > H.264 HD Video (.mp4)” as the output file format for uploading to YouTube.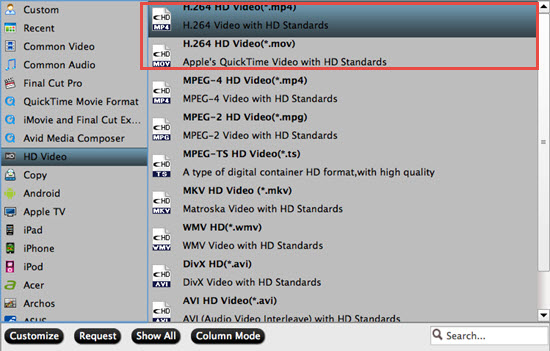
Step 3: Adjust parameters for YouTube uploading speed and quality.
Click “Settings” to open “Profile Settings” window, where you can adjust the output video codec as H.264, audio codec as MP3 or AAC, Size(pix) as 1920*1080, frame rates as 24, 25, 30, 48, 50, 60.
Step 4: Trim video length.
Open “Video Editor” window, go to “Trim” tab, drag the slider bars to set the start time and ending time to have only certain clips that you want to be converted.
Step 5: Start final video conversion process.
After setting the file location, go back to the main UI and then click this “Convert” to start your conversion.
when the conversion is over, go with the steps below to upload video to YouTube.
1. Go to YouTube.com and login your account.
2. Click the “Upload” on top right to open video upload window.
3. In the middle area, hit the “Upload” button to upload files or drag and drop the files you desire to upload to this area to start the uploading process.
4. During the process, fill the information of the videos.
5. Once the process completed, you can publish the video to YouTube for shareing.
Related program:
Pavtube Media Magician / Mac Version: A nice camcorder assistant manager, lossless camcorder video joiner, MTS/ M2TS/ MXF/ MOV/ MKV/ TiVo/ WMV/ AVI/ MPG converter and editor. Meamwhile it supported upload edited video to YouTube directly.
- Video Pedia
- What Are the Best Format&Sizes for YouTube Video Uploading