MP4 is widely used for saving media data and can be found in lots of places online or off line. In order to get better videos or more wonderful video files, you may want to adopt iMovie to edit MP4 videos. As we know that iMovie supports .MP4 videos, but many people are still fail to put MP4 to iMovie directly:
Q: I imported an MP4 file to iMovie ’11, and it goes through the copying process, but nothing showes up on screen.
Q: MP4 played just fine in QuickTime, but they “grey out” in the import window, so I couldn’t import to iMovie ’09.
Q: I can import my MP4 clips into iMovie, but when I play them, there’s an image but no sound.
Q: My MP4 plays smoothly in QuickTime, but in iMovie ’08, I get audio but no picture.
Q: What is the best way to convert MP4 files into an iMovie compatible format for free?
What’s the matter? How to deal with such MP4 to iMovie (11) importing problem? Well, this article will answer your questions. Officials said iMovie prefers MPEG-4 and H.264 video codec instead of others, but MP4 is a video container that may contain various audio and video codec (and sometimes even subtitle streams included) that iMovie does not support. If iMovie will not recognize or import your MP4, this is due to the audio or video codec issue. 
In this occasion, you have to turn your MP4 videos to iMovie compatible formats, and you’ll need a third-party media conversion software. One such software of great quality is Pavtube Video Converter for Mac, an easy-to-use yet powerful app which can effortlessly encode SD/HD/4K MP4 files to ProRes 422 MOV for iMovie, which ensures best results when working with iMovie (11) on Mac OS X (El Capitan included). Besides, it also helps to convert other video formats including AVI, WMV, MPEG, VOB, MOV, AVCHD, MTS, M2TS, XAVC-S, FLV, MKV, SWF, 3GP, MVI, ASF and etc to iMovie video format. What’s more, the Mac video conversion tool can also create files compatible with other non-linear editing systems like Adobe Premiere Pro, Avid Media Composer, FCP, FCE, etc. Just download the program and follow the step-by-step guide to make your MP4 files compatible with iMovie (11).


Other Download:
- Pavtube old official address: http://www.pavtube.com/video-converter-mac/
- Amazon Store Download: http://www.amazon.com/Pavtube-Video-Converter-Mac-Download/dp/B00QIBK0TQ
- Cnet Download: http://download.cnet.com/Pavtube-Video-Converter/3000-2194_4-76179460.html
Easy solution to encode .MP4 files to iMovie (11) with the best MP4 to iMovie Converter
Step 1: Load MP4 files to the program
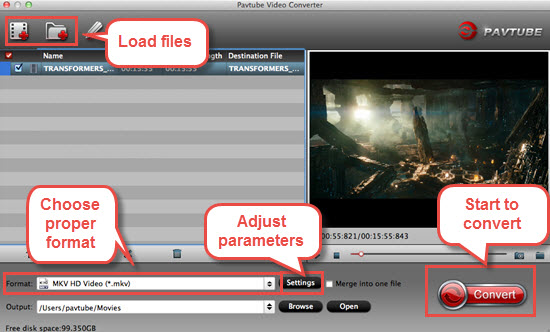
Launch the MP4 to iMovie Converter and click “Add video” button to locate the .mp4 file(s) you want to add. Check the “Merge into one file” box, you can join several .mp4 clips together if necessary. 
Step 2: Choose iMovie editable format
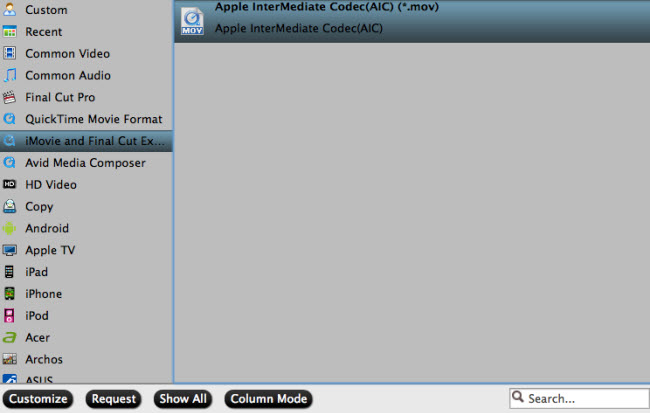
Click “Format” pull down list to select iMovie and Final Cut Express > Apple InterMediate Codec(AIC) (*.mov) as the best video format for iMovie (11). 
Step 3: Edit the MP4 videos (Optional)
By clicking “Edit selected task” button, you can trim, crop the video, or add watermark, adjust effect, attaching subtitles for pre-editing your video files so that you can simplify your iMovie editing.
Trim – Choose to reserve the part you need. Just choose the chapter which you need to trim, to set “start time” or “end time”, type the portion which you want to save.
Crop – Remove black edges of your video or just get the scale of this video you want.
Effect – Adjust the effects by adjusting the parameters, such as:
1) Deinterlacing – If there are some stripes on the picture, you can check this option to make a better picture effect. (Checked by default)
2) Under Effect tab, you can add special effects like Simple Gauss Blur, Flip Color, Invert, Aged Film to your source video. In Color Control section, you can correct color by adjusting brightness, contrast, and saturation.
Audio Editor – You can replace/remove original audio, and set audio fade in/out effects.
Subtitle – You can add *.srt or *.ass/*.ssa subtitles to the video as hard subtitles.
Tips: Adjust the video, audio settings (Optional)
Click “Settings” to fix the frame rate, bitrate, video size, etc to your needs. To have a smooth editing with iMovie, you need create the files with the appropriate resolution and frame rate that matches your source footage.
Step 4: Start MP4 to iMovie conversion
Click “Start conversion” button at the bottom right corner to finish endocing MP4 to AIC .mov for iMovie (11) on Mac OS X. After the conversion, click “Open” to locate the encoded videos and then launch iMovie,choose File > Import > Movies…, to import the converted MP4 video into iMovie; prepare for editing. You will find that it’s just a piece of cake to edit MP4 files in iMovie (11).


